Publish & Call API's
This doc describe how to consume the APIs that you created on the workflow builder.
Publish an API
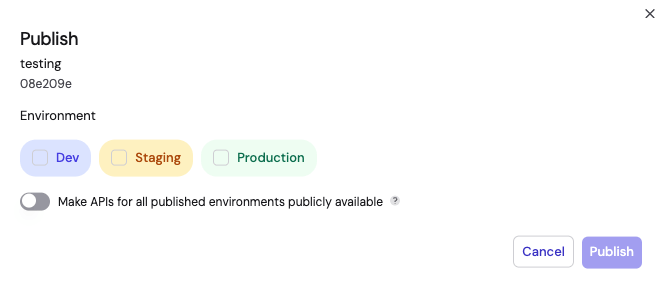
Once you have finished your Workflow, it is time to publish it. Click the Version & Publish button in the top right corner. Under Version History click on the Publish button inside your current edit. Remember to:
- Give a short description of your published workflow version
- Select the published environment (Click here to learn about the different publishing environments Fleak offers)
- Click Publish on the bottom right of the pop-up window.
Versioning
At Fleak, we use a Git-like version control system. Each time users define and refine their workflow logic with our low-code platform, an explicit save creates a new commit or revision, each with a unique hash. This precise version control allows for accurate tracking and management of different API states.
A workflow can have many versions. Fleak's Workflow has 3 environments: Dev, Staging, and Prod. When a commit is published to an environment, the API url will be pointing to that specific commit.
Environments
- Dev: For development and testing. It allows developers to safely implement and debug new features without impacting other stages of the workflow. This environment is ideal for experimentation and iteration, providing the flexibility needed to fine-tune and refine the workflow logic.
- Staging: serves as a mirror of the production setup, providing a crucial final testing ground. In this space, quality assurance (QA) processes are conducted to ensure that all features and functionalities work as expected. It's the last step before release, allowing teams to catch any potential issues in a controlled setting.
- Production: the live platform where end-users interact with the product. It is designed to prioritize stability and performance to deliver a seamless experience. This environment ensures that all features are reliable and operate smoothly, meeting the expectations of users and stakeholders alike.
Tips
- One can publish the same commit to all three environments at the same time
- When a user publishes to an environment that has already been published to, the old endpoint will be overwritten by the new one.
- One can check their version history under "Version & Publish" to see which commit is connected to what environment.
Call a Published API
After publishing your workflow, you can interact with your API using the provided endpoint and your API key. You can call your API using CURL, JavaScript, or Python.
Endpoint
Your API endpoint will be in the following format:
https://data.fleak.ai/api/v1/events/{workflow-id}/{environment}
Where:
workflow-idis your unique workflow identifierenvironmentis eitherdev,staging, orprodbased on where you published.
Authentication
All API calls require an API key for authentication. Include your API key in the request headers:
api-key: $FLEAK_API_KEY
Replace FLEAK_API_KEY with your own secret API key. For more information, check the Fleak API Key Doc to learn more.
Client Examples
You can call your API using any of the following methods:
CURL
curl -X "POST" \
"https://data.fleak.ai/api/v1/events/{workflow-id}/{environment}" \
-H "accept: /" \
-H "api-key: $FLEAK_API_KEY" \
-H "Content-Type: application/json" \
-d '[
{
"content": "your_input_here"
}
]'
Javascript
fetch('https://data.fleak.ai/api/v1/events/{workflow-id}/{environment}', {
  method: 'POST',
  headers: {
    'api-key': 'FLEAK_API_KEY',
    'Content-Type': 'application/json'
  },
  body: JSON.stringify([
    {
      "content": "your_input_here"
    }
  ])
})
.then(response => response.json())
.then(data => console.log(data))
.catch((error) => console.error('Error:', error));
Python
import os
import requests

url = "https://data.fleak.ai/api/v1/events/{workflow-id}/{environment}"
headers = {
  "api-key": os.environ["FLEAK_API_KEY"],
  "Content-Type": "application/json"
}
payload = [
  {
    "content": "your_input_here"
  }
]

response = requests.post(url, headers=headers, json=payload)
print(response.json())
HTTP Request Format
-
Method: POST
-
Headers:
- api-key: Your Fleak API key
- Content-Type: application/json
- accept: /
-
Body: JSON array containing your input data
Response
The API will return a JSON response containing the output from your workflow. The exact structure depends on your workflow configuration and output chosen.
Tips
- Replace
FLEAK_API_KEYwith your actual API key - Modify the request body according to your workflow's input requirements
- For security best practices, store your API key as an environment variable and never expose it in your code.