Mapping Non-JSON Logs
Create OCSF mappings from non-JSON logs like syslog, Apache/Nginx logs, and firewall logs by manually configuring or AI-generating parser chains that extract structured data from unstructured text.
Quick Demo
Watch this short video to see how to create mappings from Non-JSON logs:
OCSF Mapping App: Manually Configured Parsing Nodes Using Mixed Parsing Patterns
OCSF Mapping App: AI Generated Parsing Nodes Using Grok Patterns
OCSF Mapping App: Create a New Project Using Mixed Log Samples
What are Non-JSON Logs?
Non-JSON logs refer to log data that is not in JSON format, typically in unstructured or semi-structured text formats. These logs need to be parsed first before useful information can be extracted. Common Non-JSON Log Formats:
- Plain Text logs
- Syslog format
- Apache/Nginx access logs
- CSV format
- Key-Value format
- Windows Record Log format
- Firewall logs (such as Cisco ASA)
Creating a Mapping from Non-JSON Logs (Manually Configured Parsing Nodes Using Mixed Parsing Patterns)
To create a new mapping from non-JSON logs:
- Click the "New Mapping" button from your project dashboard
- Select "From Non-JSON Log" from the options presented
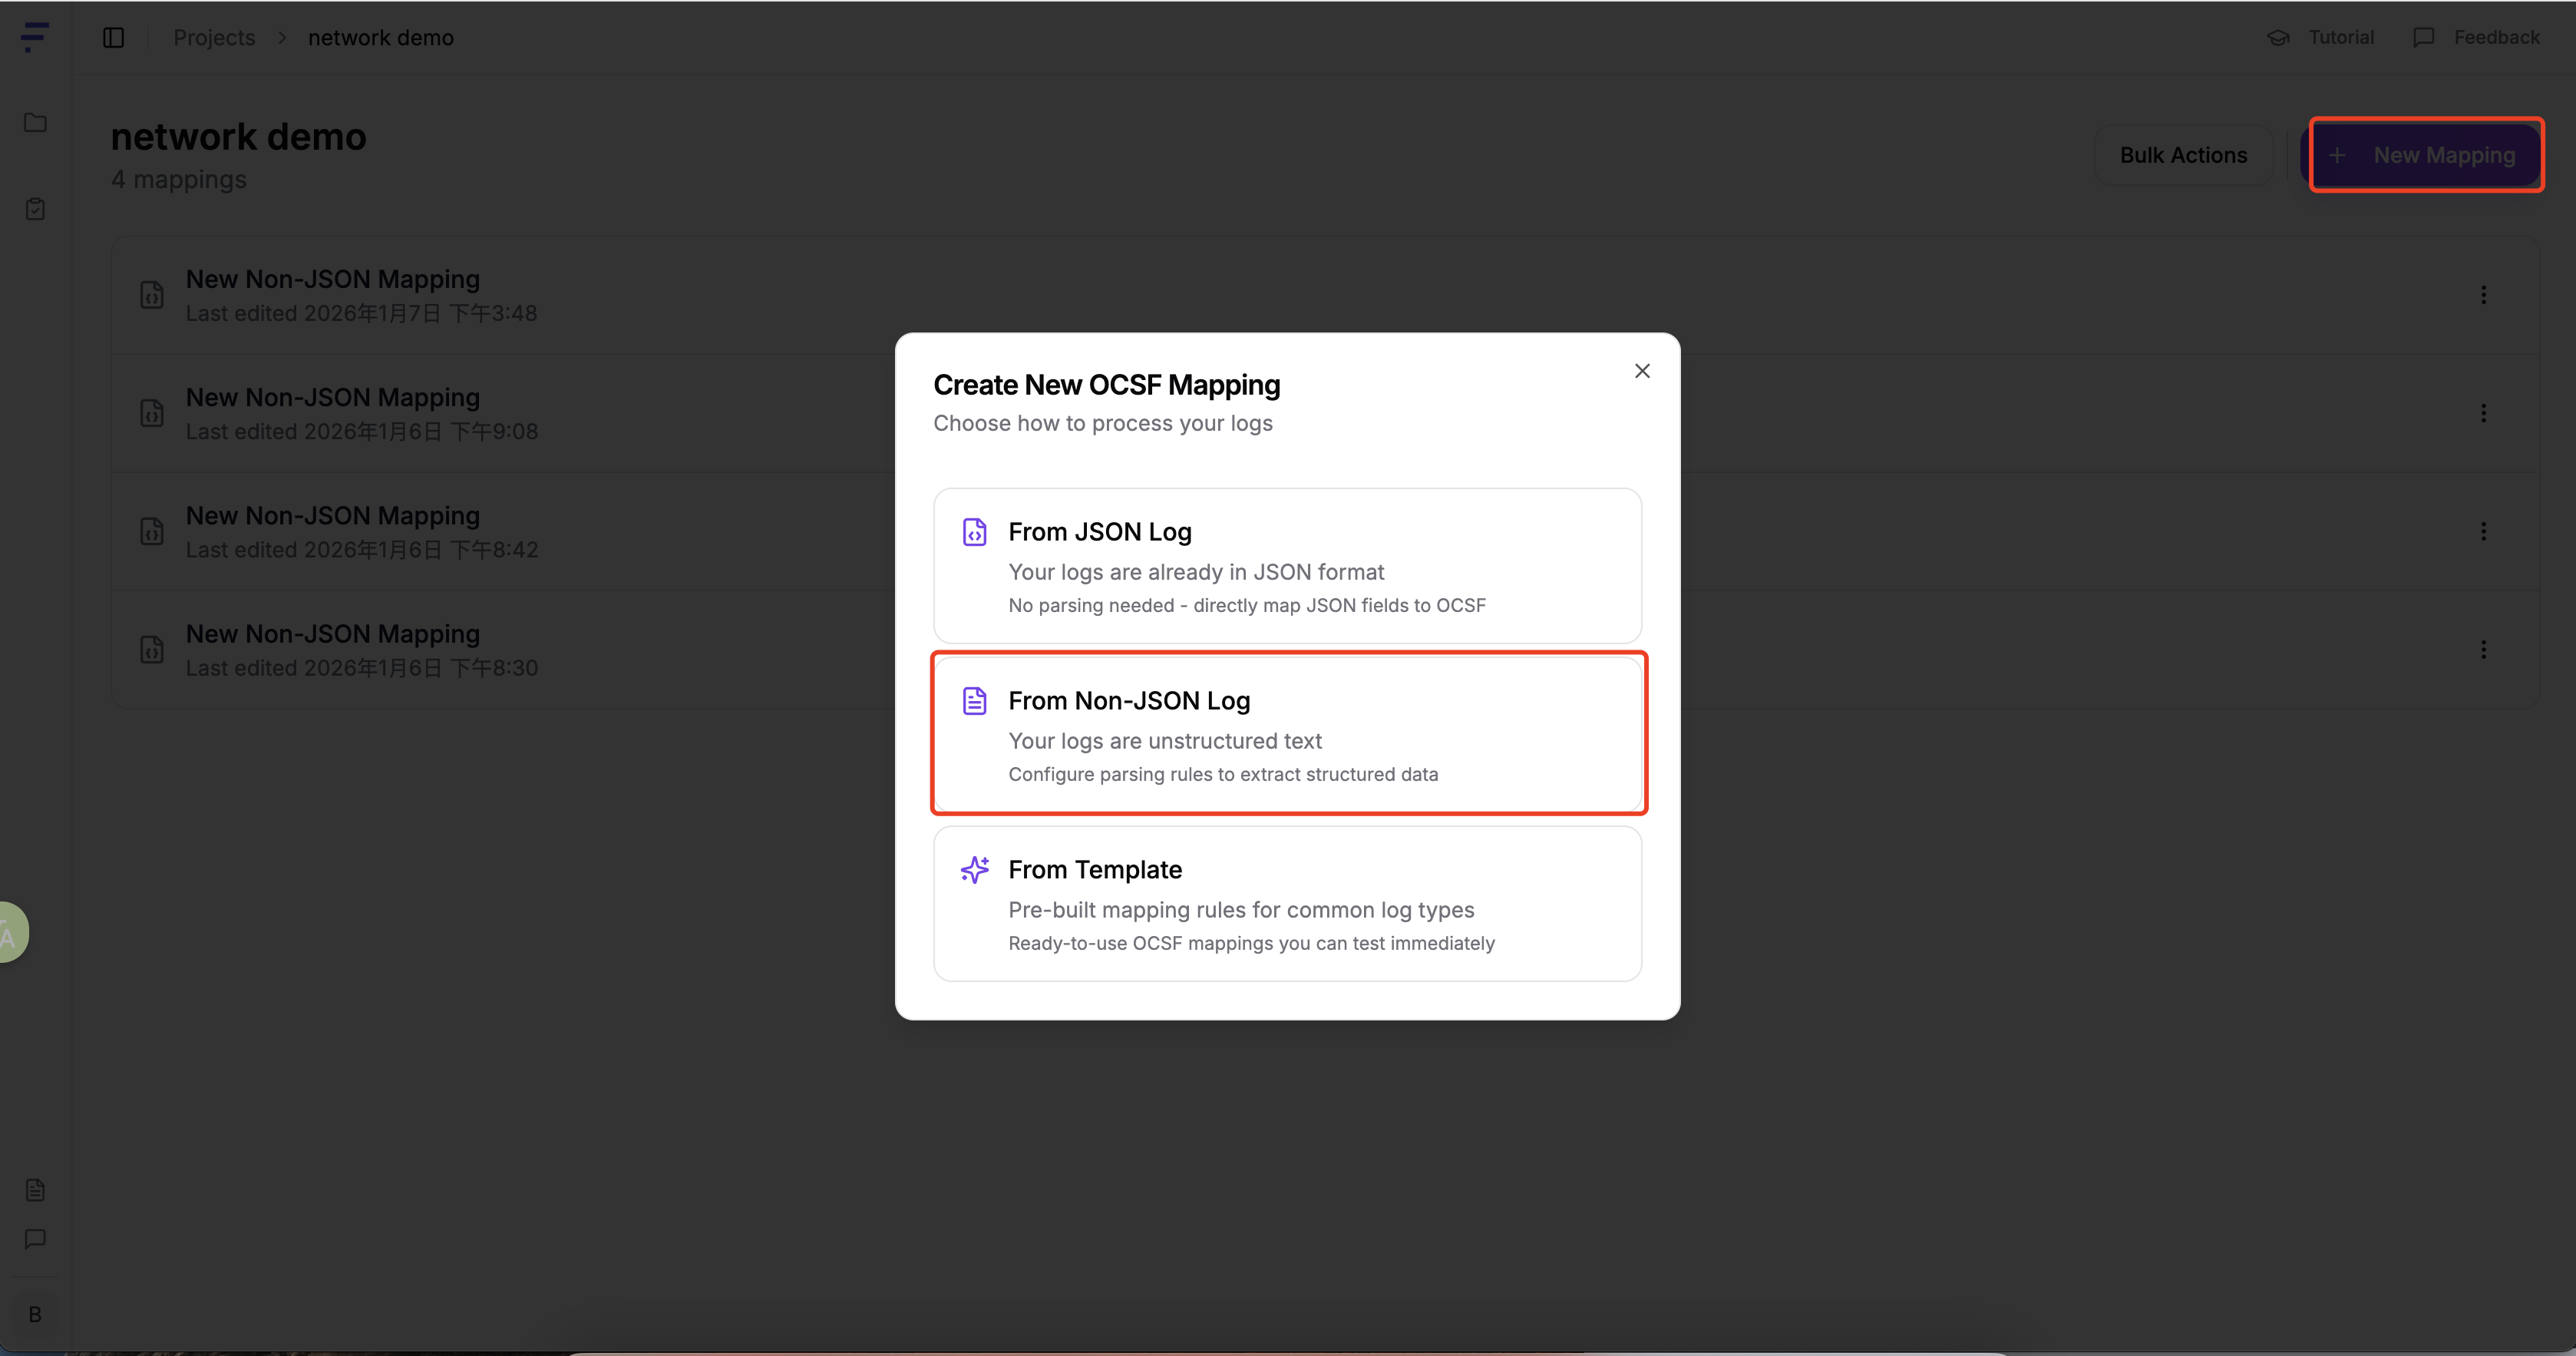
After inputting your non-JSON logs, click "Continue to Parser Configuration"
Working with Non-JSON Logs
Paste Non-JSON Logs: Directly paste your non-JSON logs into the input area

Configuring the Parser
The core function of the parser is to convert unstructured log data into a structured format for easier subsequent processing and analysis.
The parser employs a cascading processing mechanism: the output of each parser automatically becomes the input of the next parser, forming a processing chain. Example Workflow:
Original log → Parser 1 → Parser 2 → Parser 3 → Structured output
- Parser 1: Processes the raw log and outputs a content field containing the complete log content (typically a long string)
- Parser 2: Performs deep parsing of the content field, extracting specific structured fields (such as timestamp, IP address, record type, etc.)
- Parser 3 and beyond: Continues to refine the parsing, breaking down complex fields into more granular key-value pairs
Through this layer-by-layer parsing approach, the original unstructured log is ultimately converted into fully structured data.
Example:
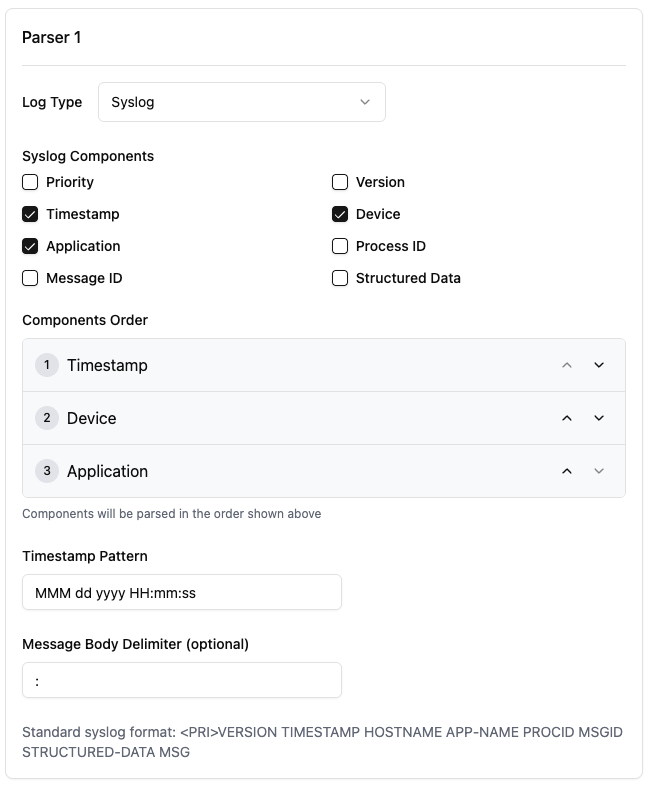
Add a "syslog" type parser. The parser type should be selected based on the log format. For example, for Windows log format, the Parser Type should be "Windows Multiline". Select the required syslog fields, such as:
- Priority
- Timestamp
- Device
- Process ID
The above fields are required for this document's example.
Set the time format
- Set the appropriate time format based on the log content.
- Set the message body delimiter
- Set the appropriate delimiter based on the log content.
After all necessary parameters are configured, click "Preview" in the "Parser Input" column to display the above settings. At this point, our first parser configuration is complete. Click "Add Parser" to add more parsers.
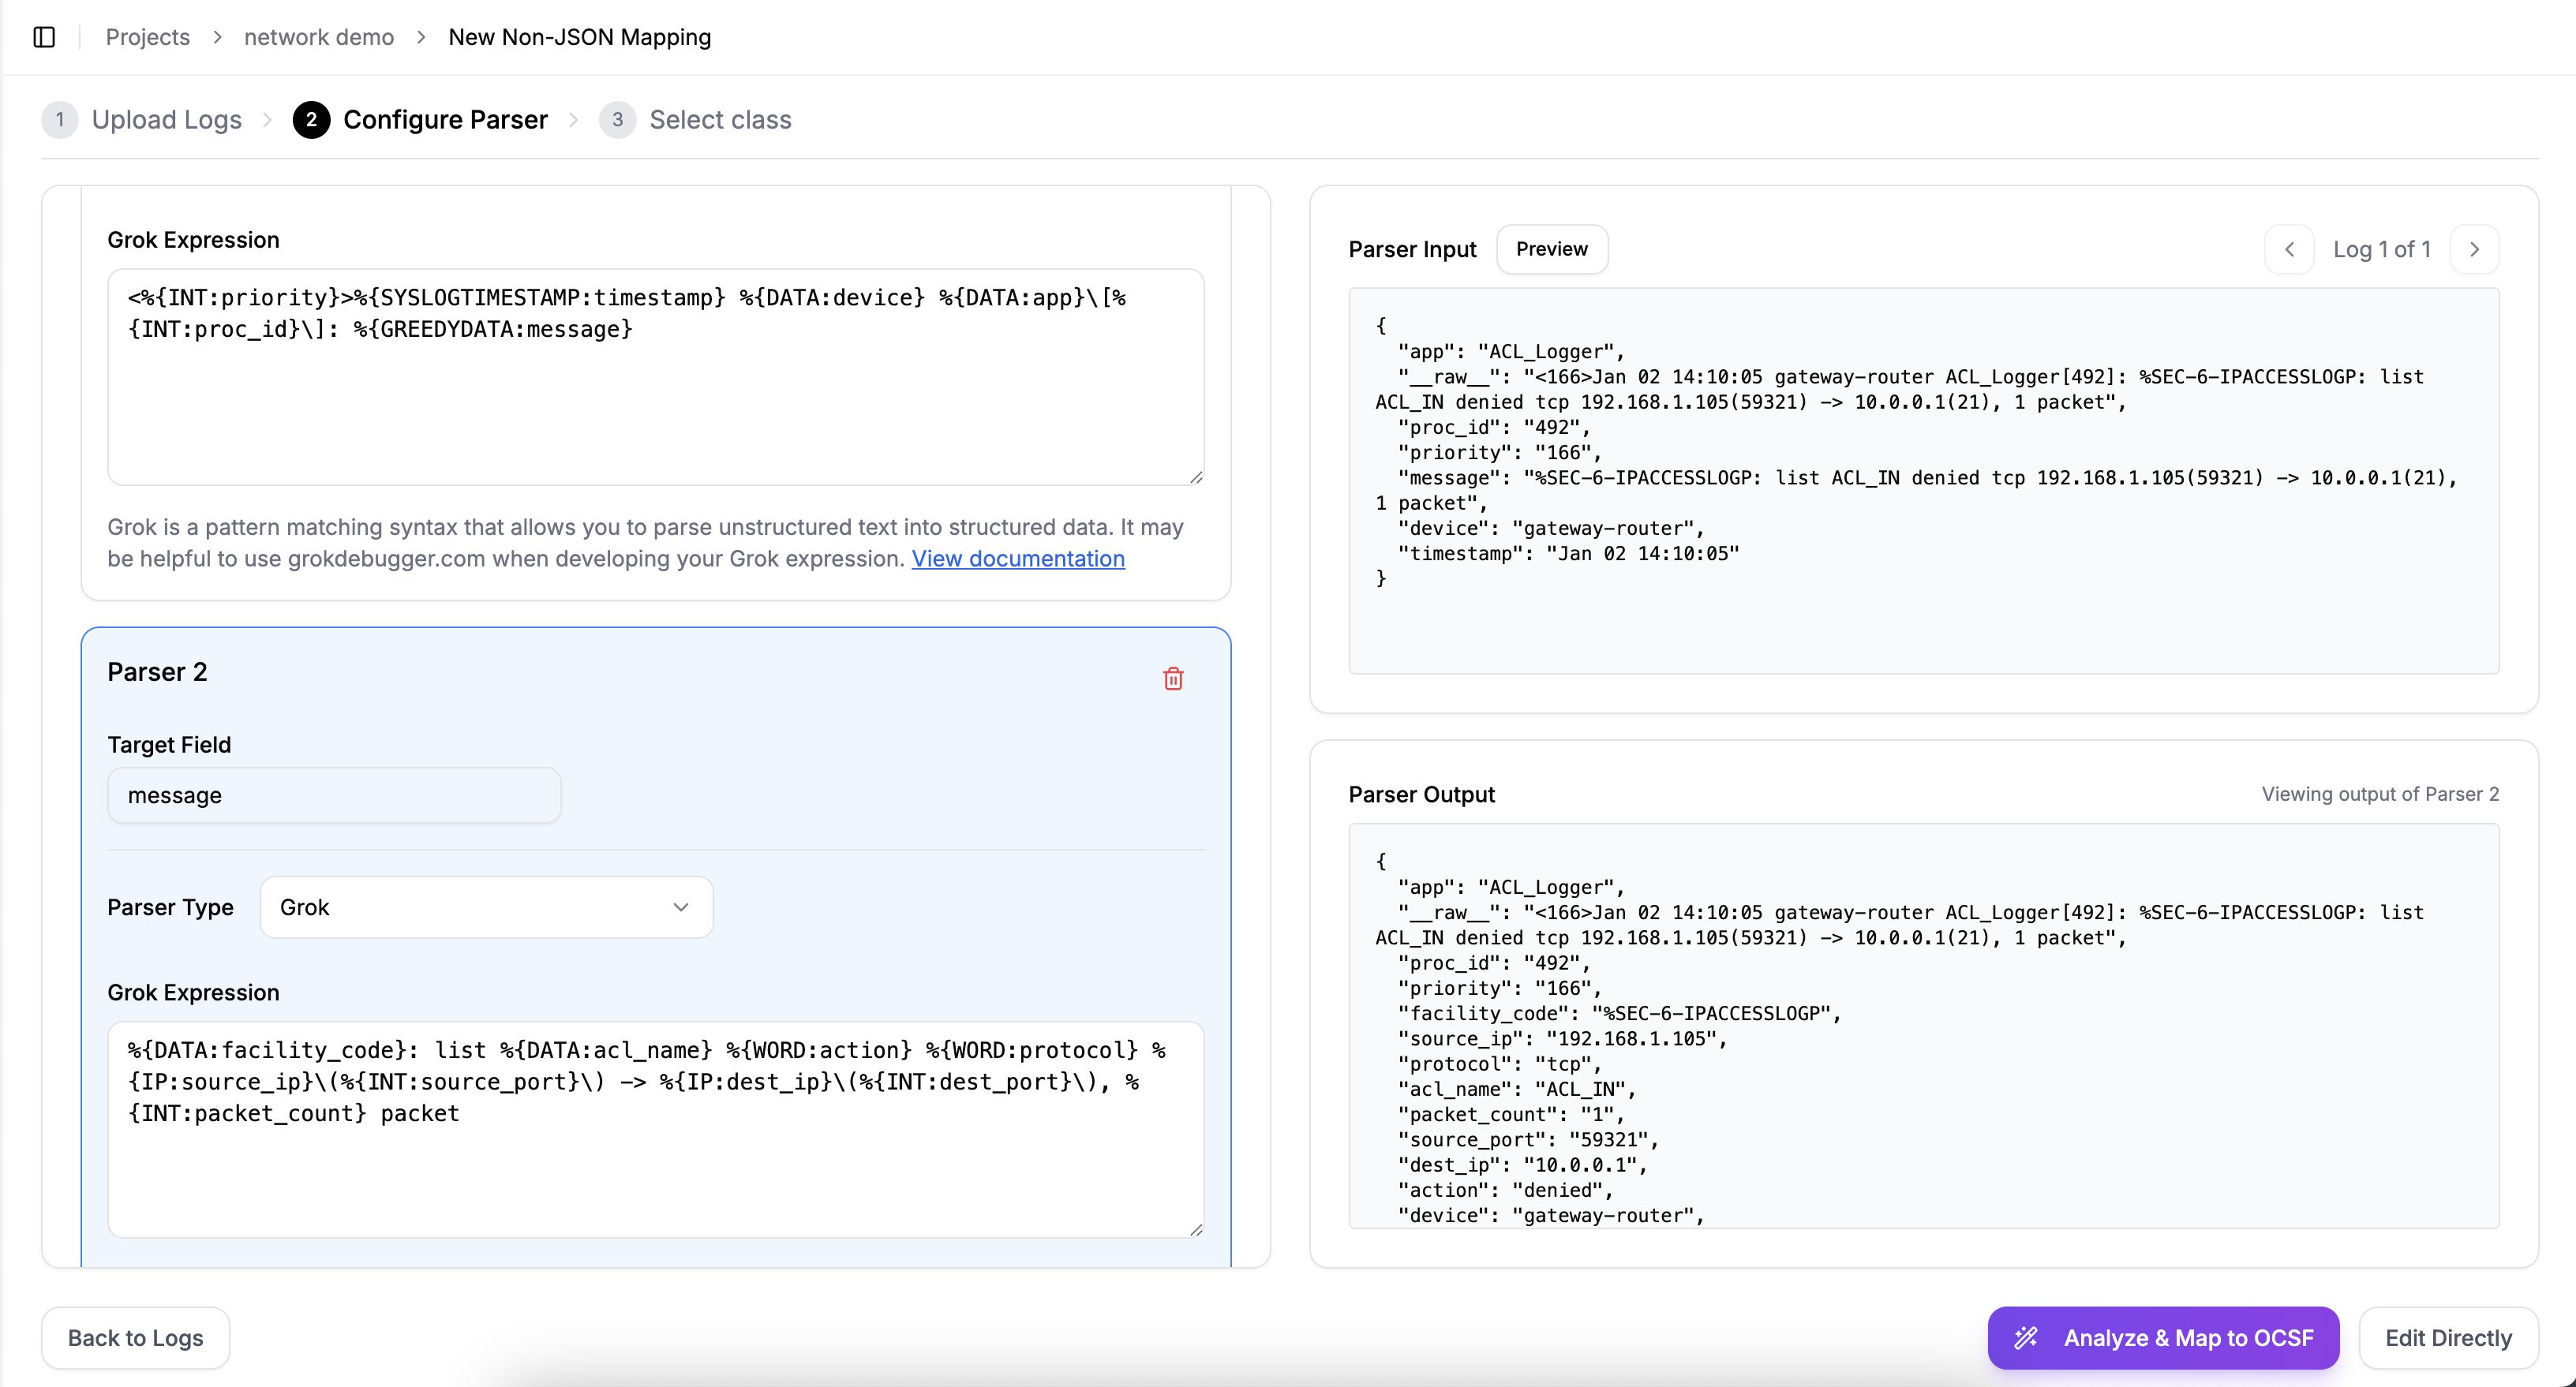
Add Parser 2 to parse more content from the logs.
The Target Field comes from the content field in Parser 1 input.
- Select "Grok" for Parser Type, or other parsing types.
- Write the Grok expression.

Parse more detailed log content
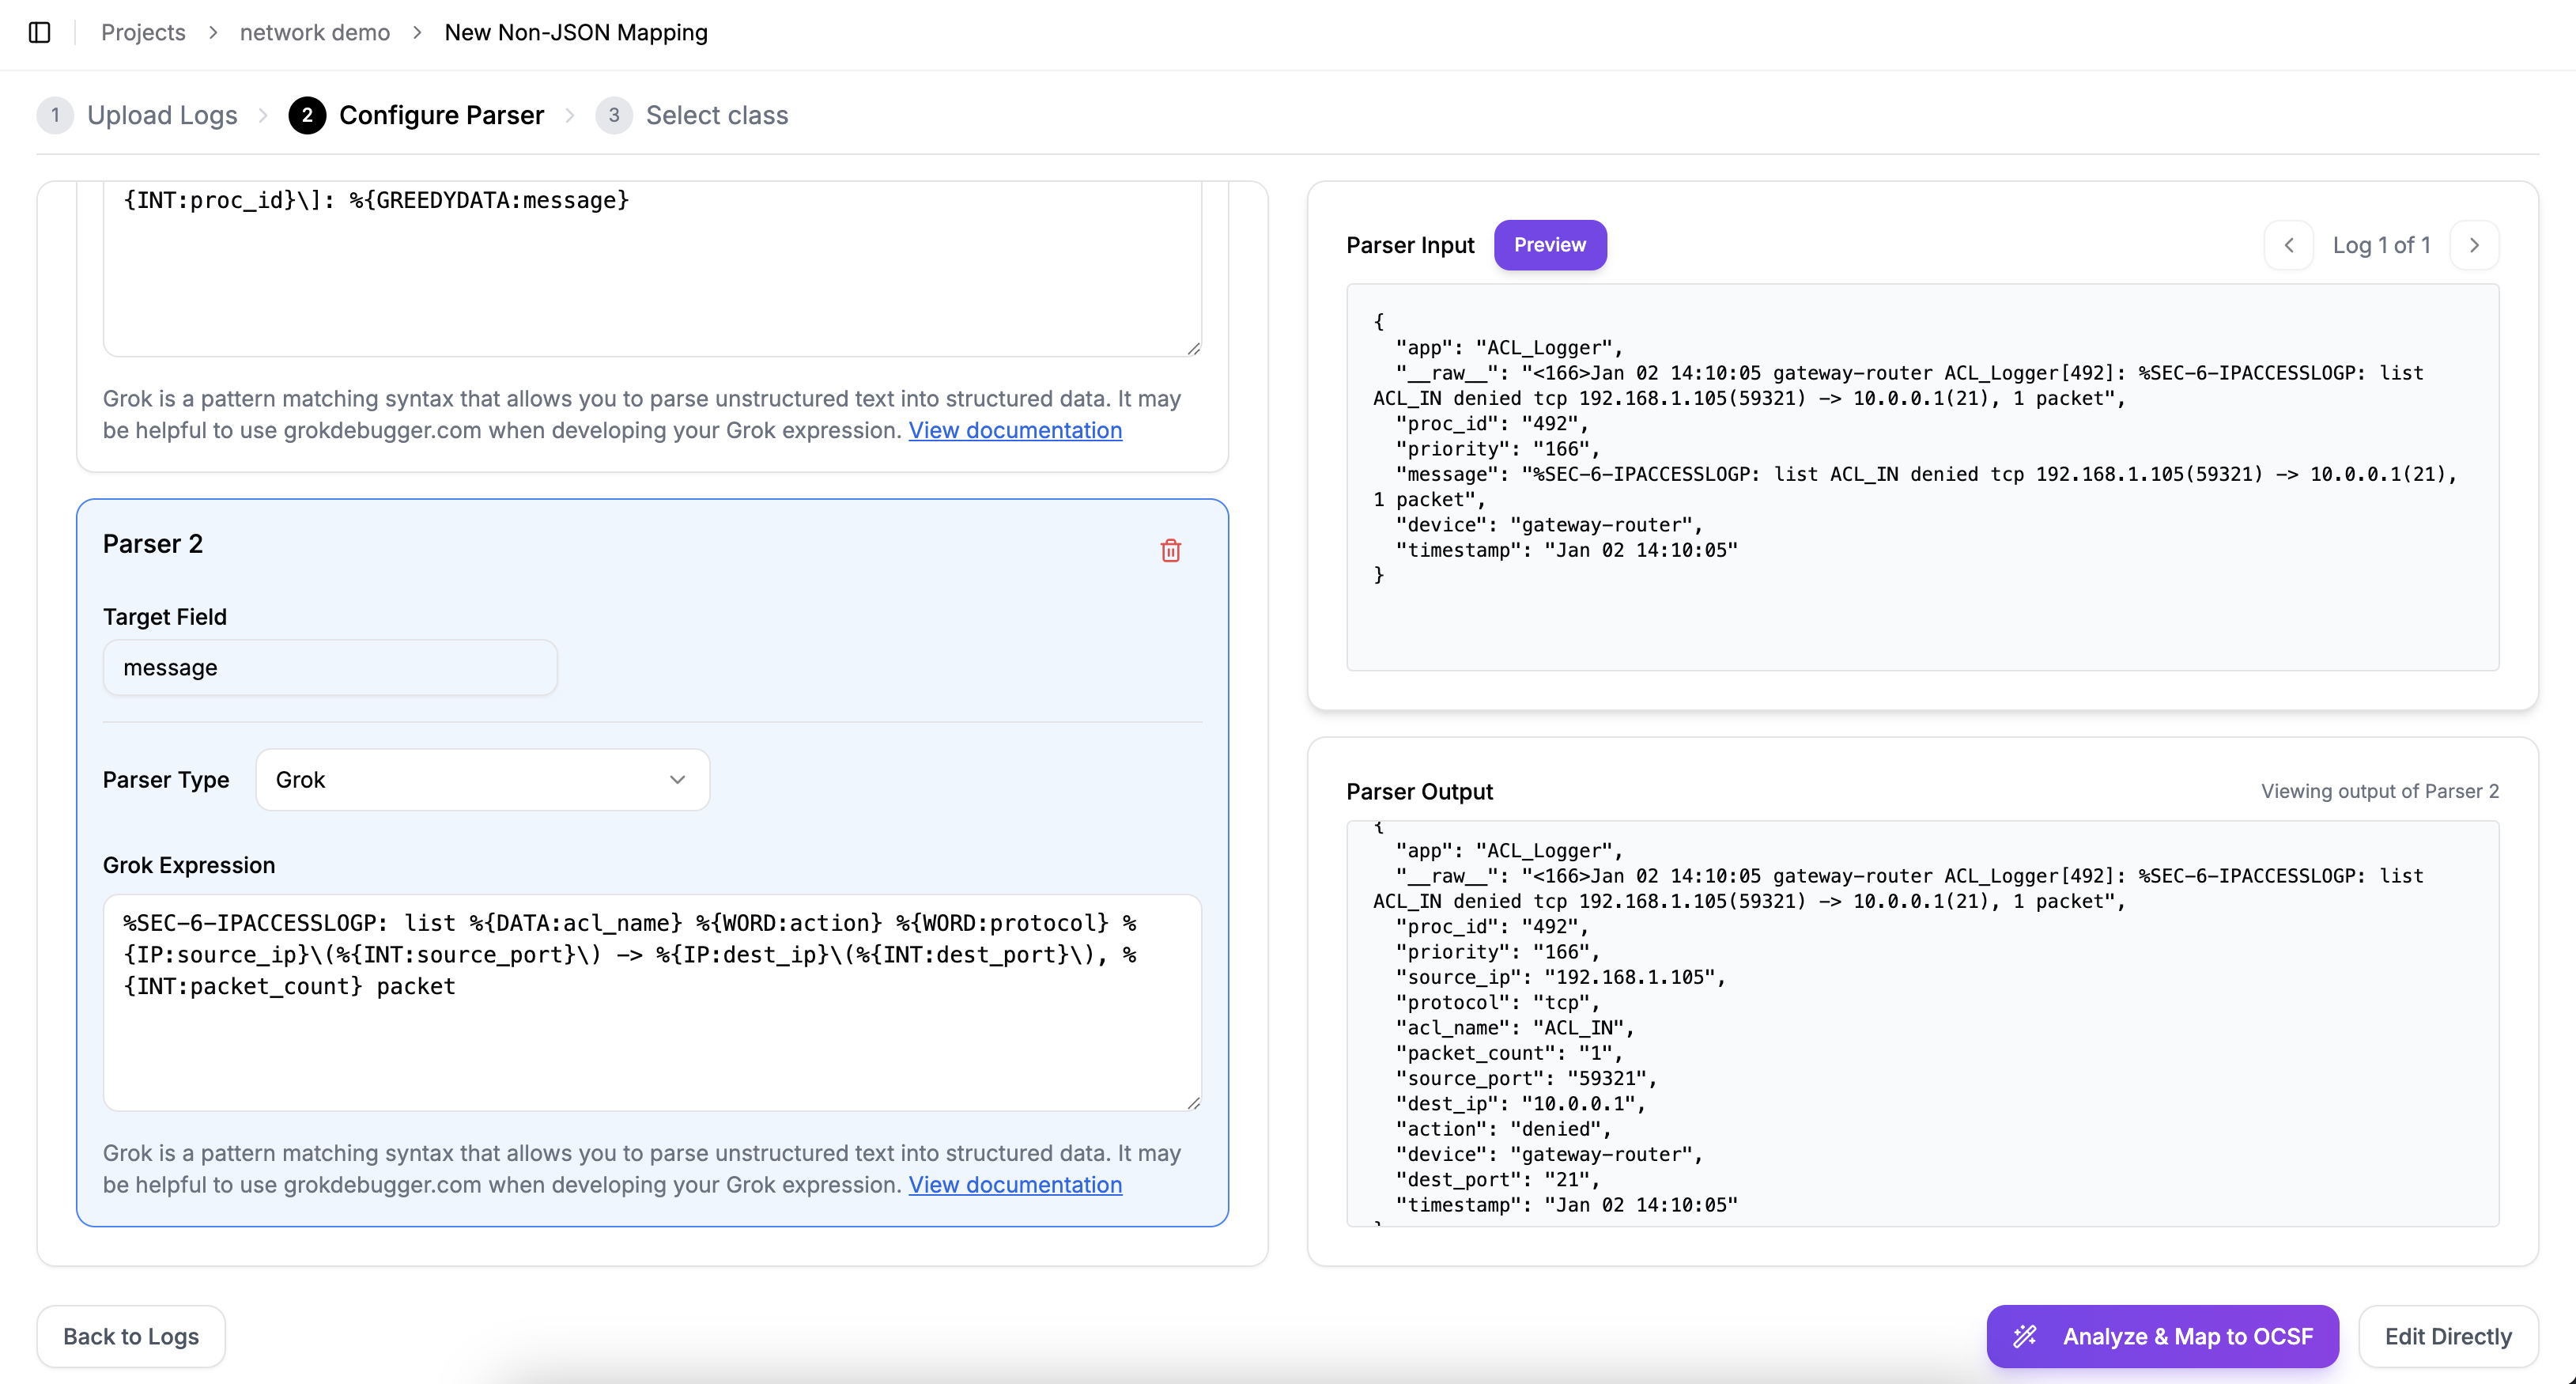
Add Parser 3 to break down the "cisco_message" field content into more key-value pairs.
- Fill in Target Field: cisco_message, and write the parsing Grok expression.
- Click "Preview" to view the "Parser Output".
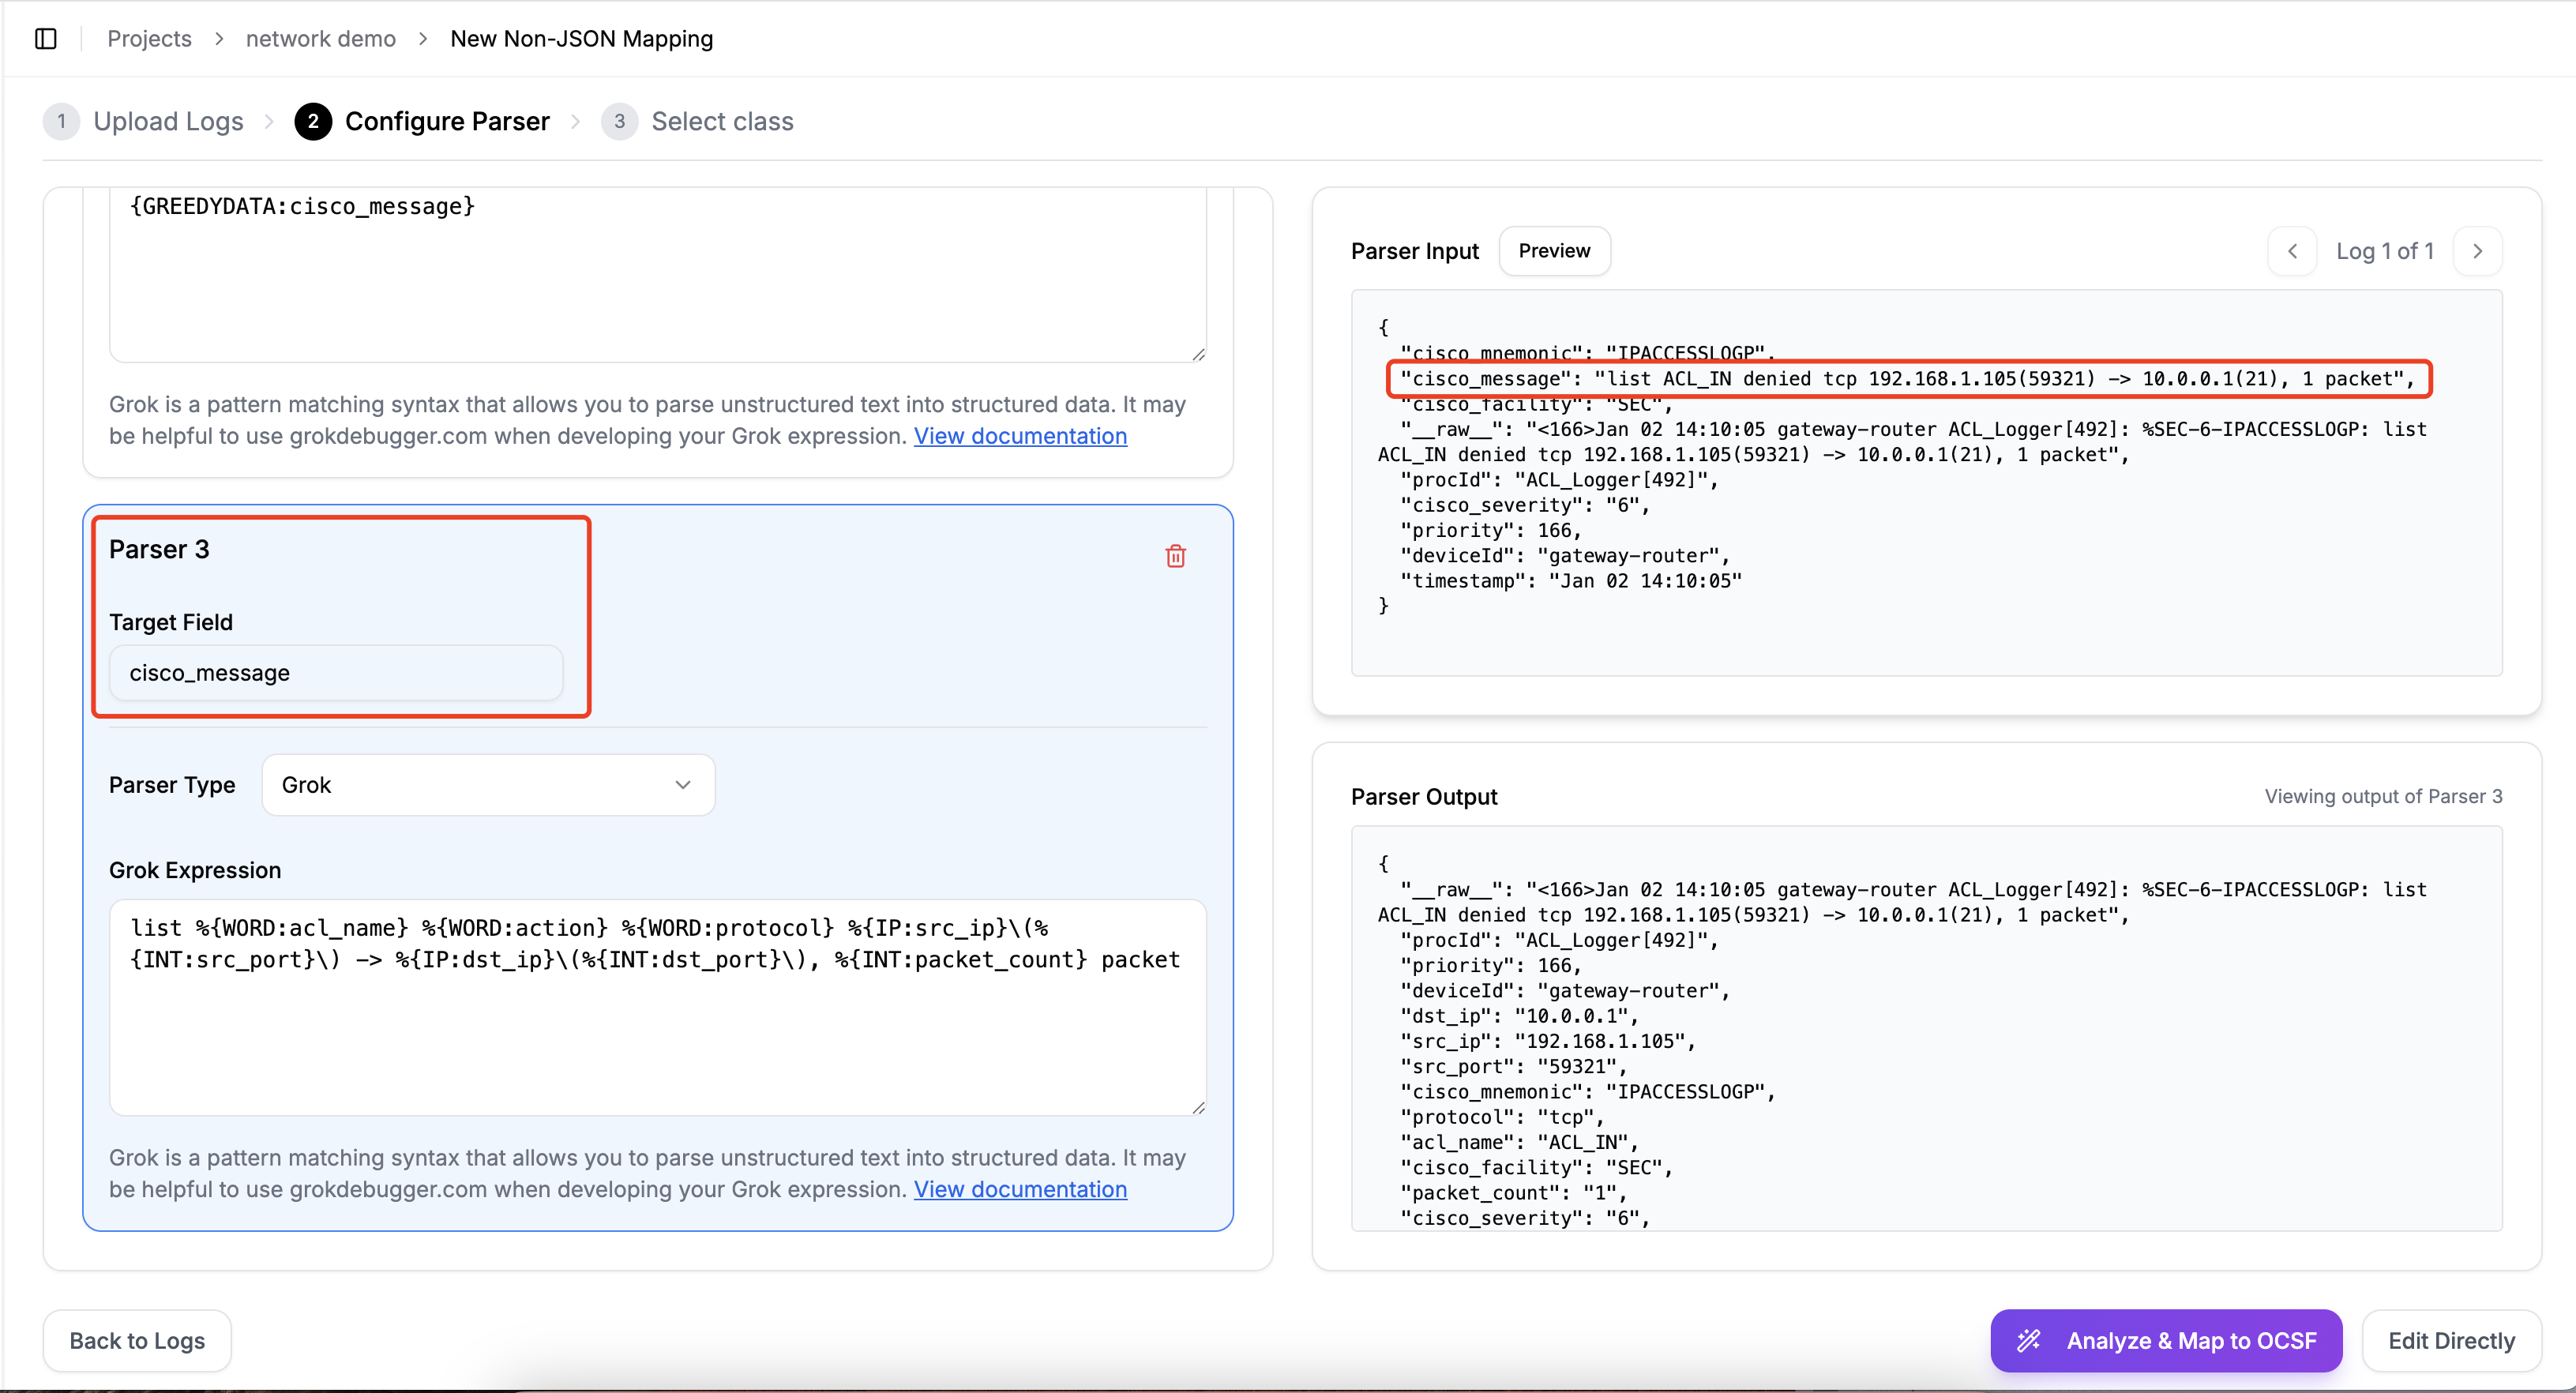
If the Parser Output content is parsed correctly, click "Analyze & Map to OCSF" or "Edit Directly".
Creating a Mapping from Non-JSON Logs (AI Generated Parsing Nodes Using Grok Patterns)
To create a new mapping from non-JSON logs:
- Click the "New Mapping" button from your project dashboard
- Select "From Non-JSON Log" from the options presented
After inputting your non-JSON logs, click "Continue to Parser Configuration"
Working with Non-JSON Logs
Paste Non-JSON Logs: Directly paste your non-JSON logs into the input area
Configuring the Parser
Choose to use AI-generated parser configuration.
Click the "generate" button to the right of Parser Configuration.
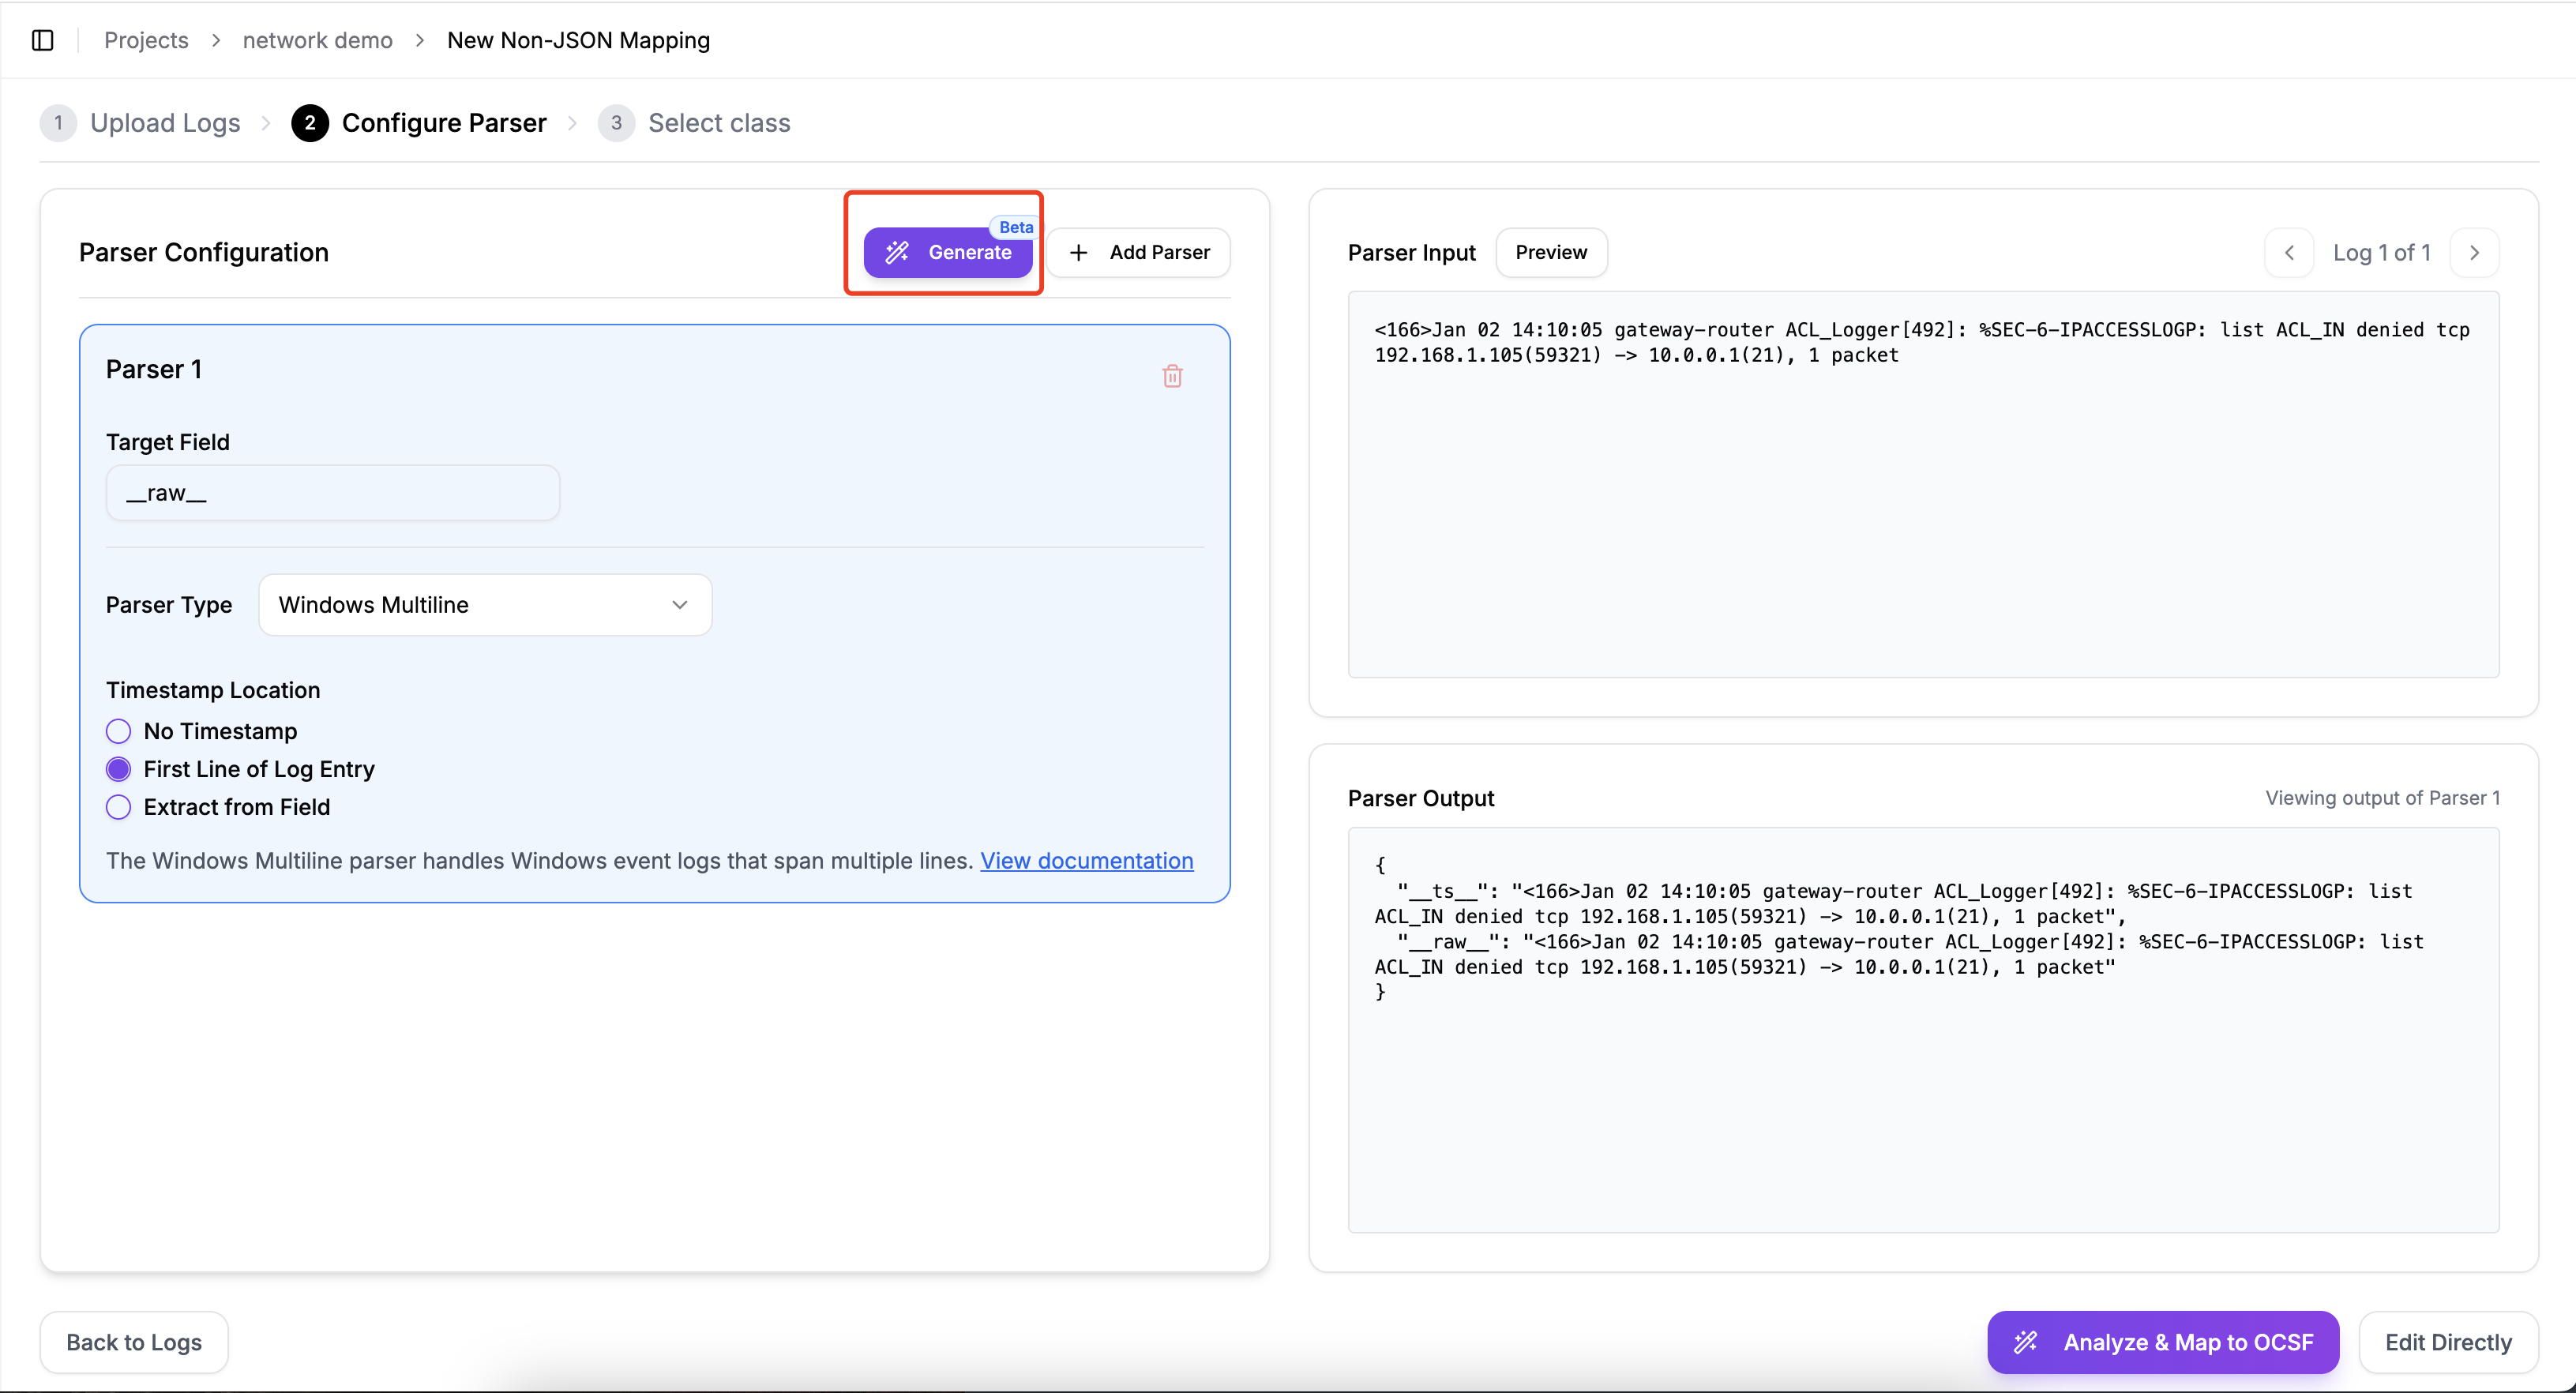
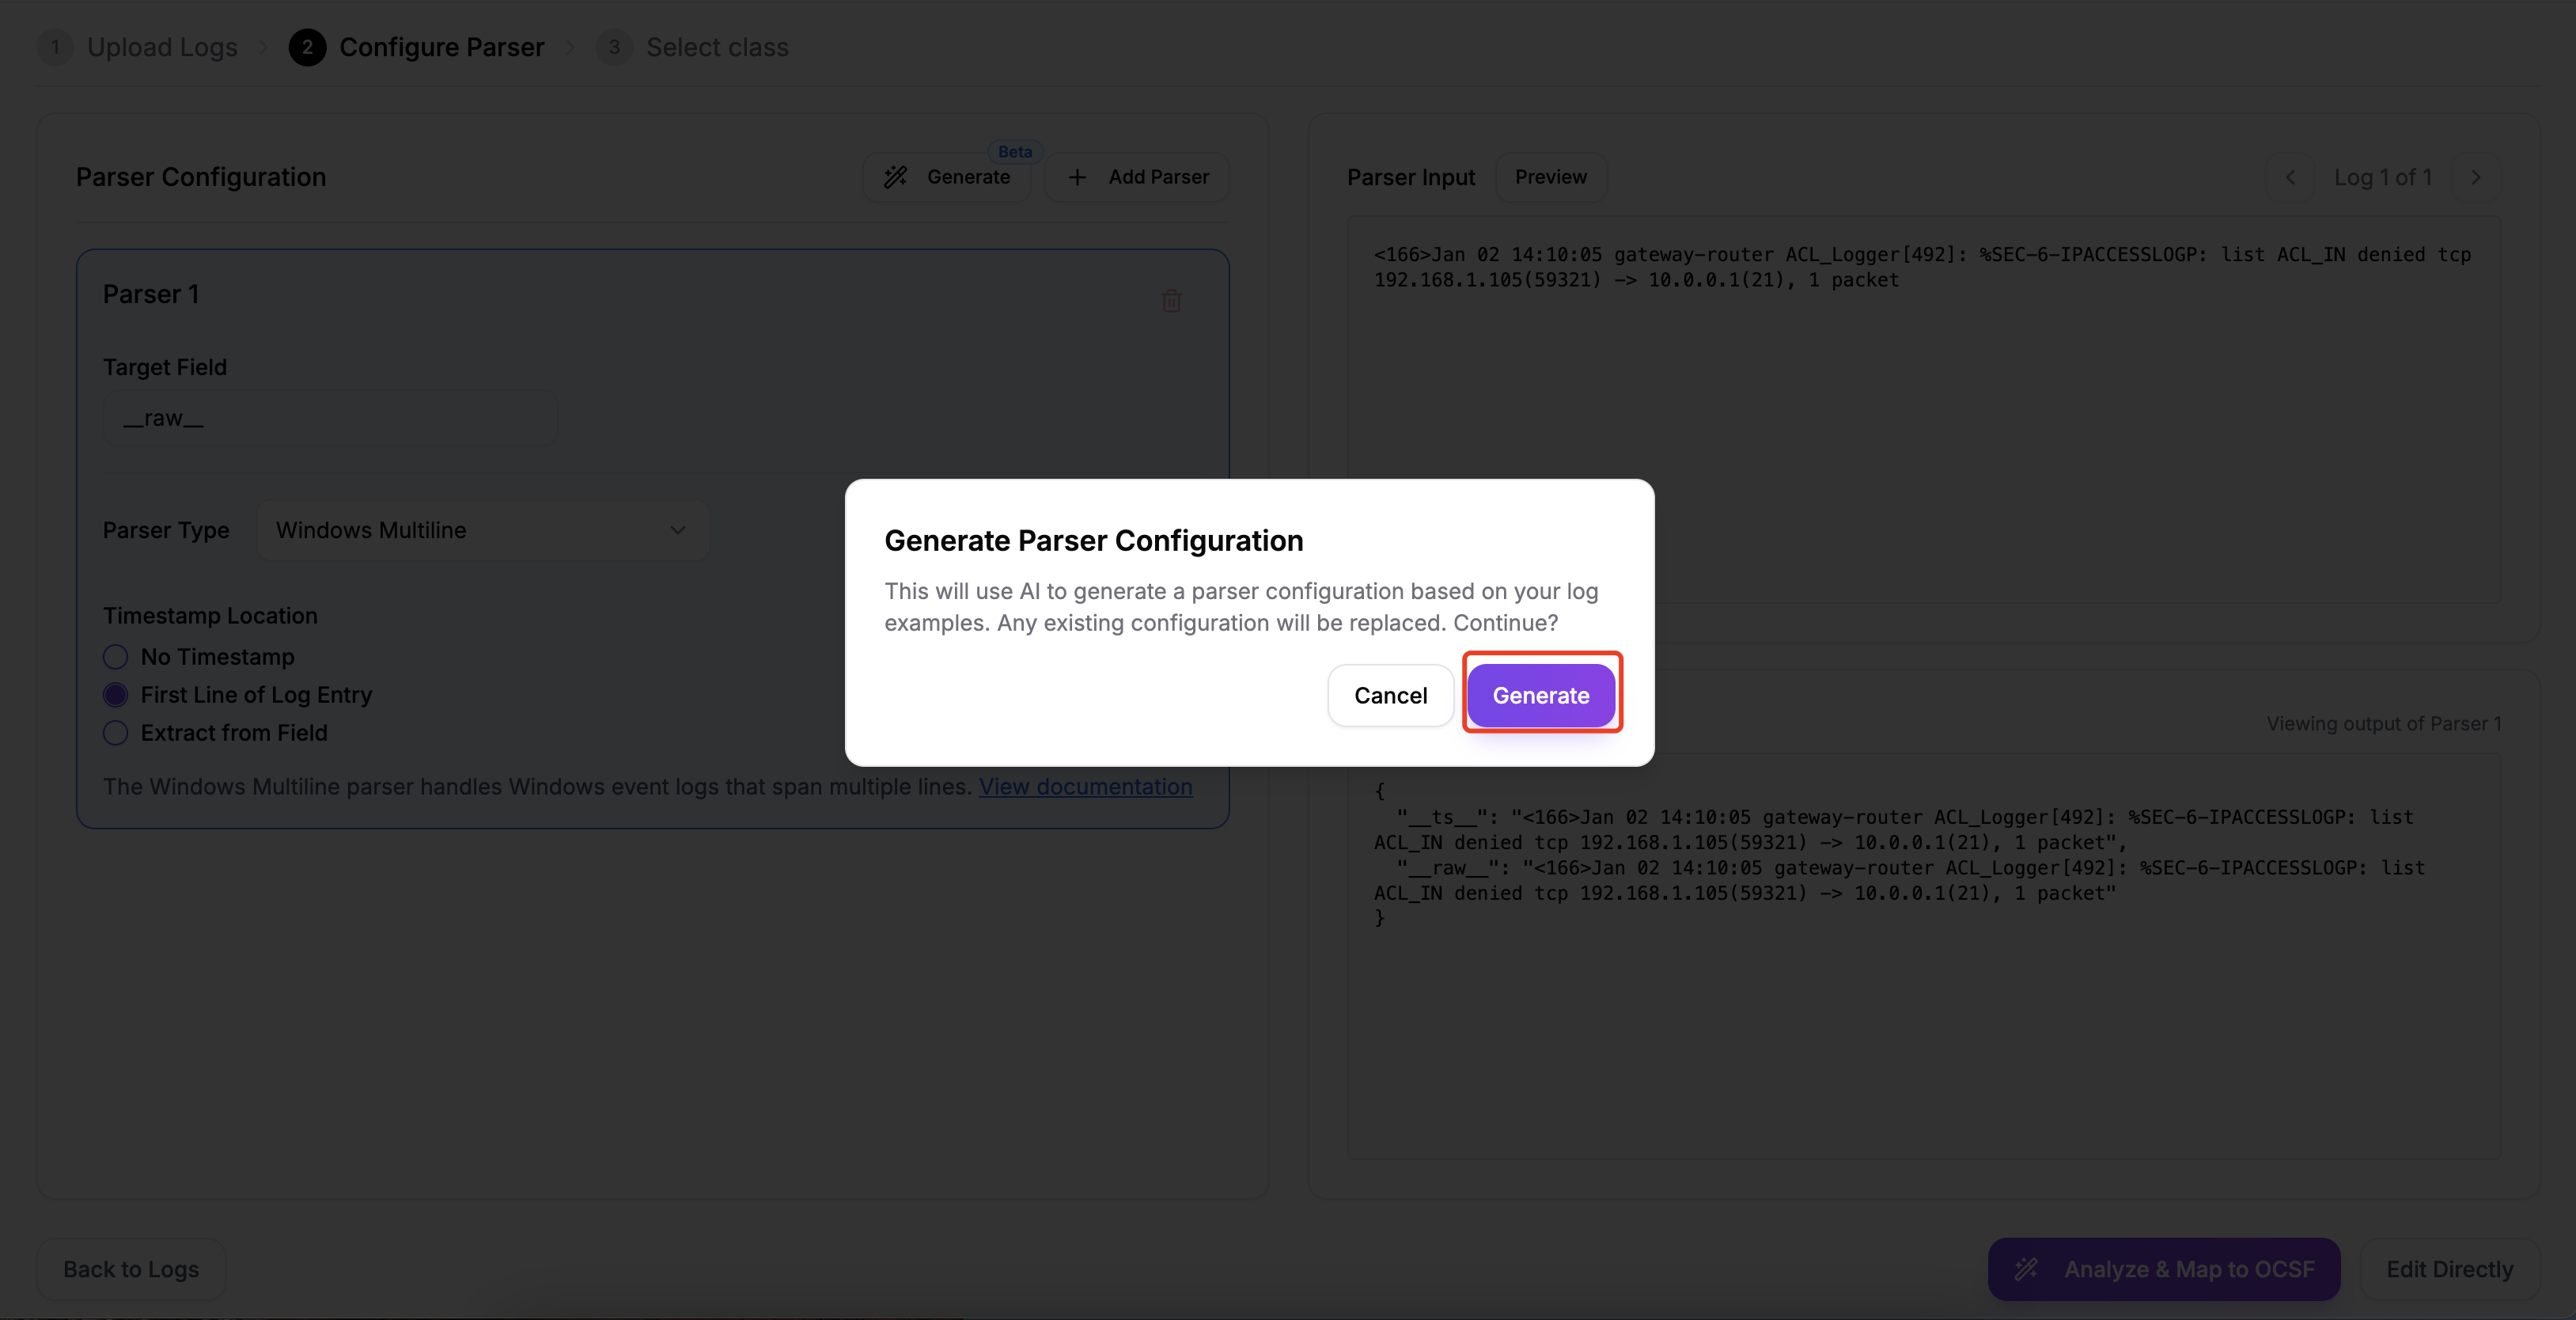
The parser AI analyzes the input logs and generates corresponding configurations and expressions to transform unstructured logs into a structured data format.
You can also modify and adjust the fields and format as needed, based on the output generated by the parser AI.
For example, in the following example, we remove the "facility_code" field:
After editing the Grok expression, click "Preview" to the right of "Parser Input" to view the edited Parser Output. Once you confirm that everything is correct, you can proceed to the next step.
Generating Mapping Rules
You have two options for creating mapping rules:
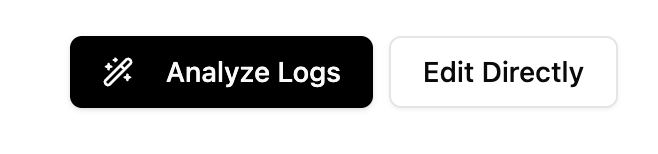
- Analyze Logs: Let the AI generate mapping rules automatically
- Edit Directly: Create mapping rules manually in the editor
AI-Generated Mappings
For AI-generated mappings:
- Provide clear additional context about your logs
- Click "Analyze Logs" to begin the process
- The AI will present several OCSF class options that might match your log type
- Select the most appropriate class for your logs
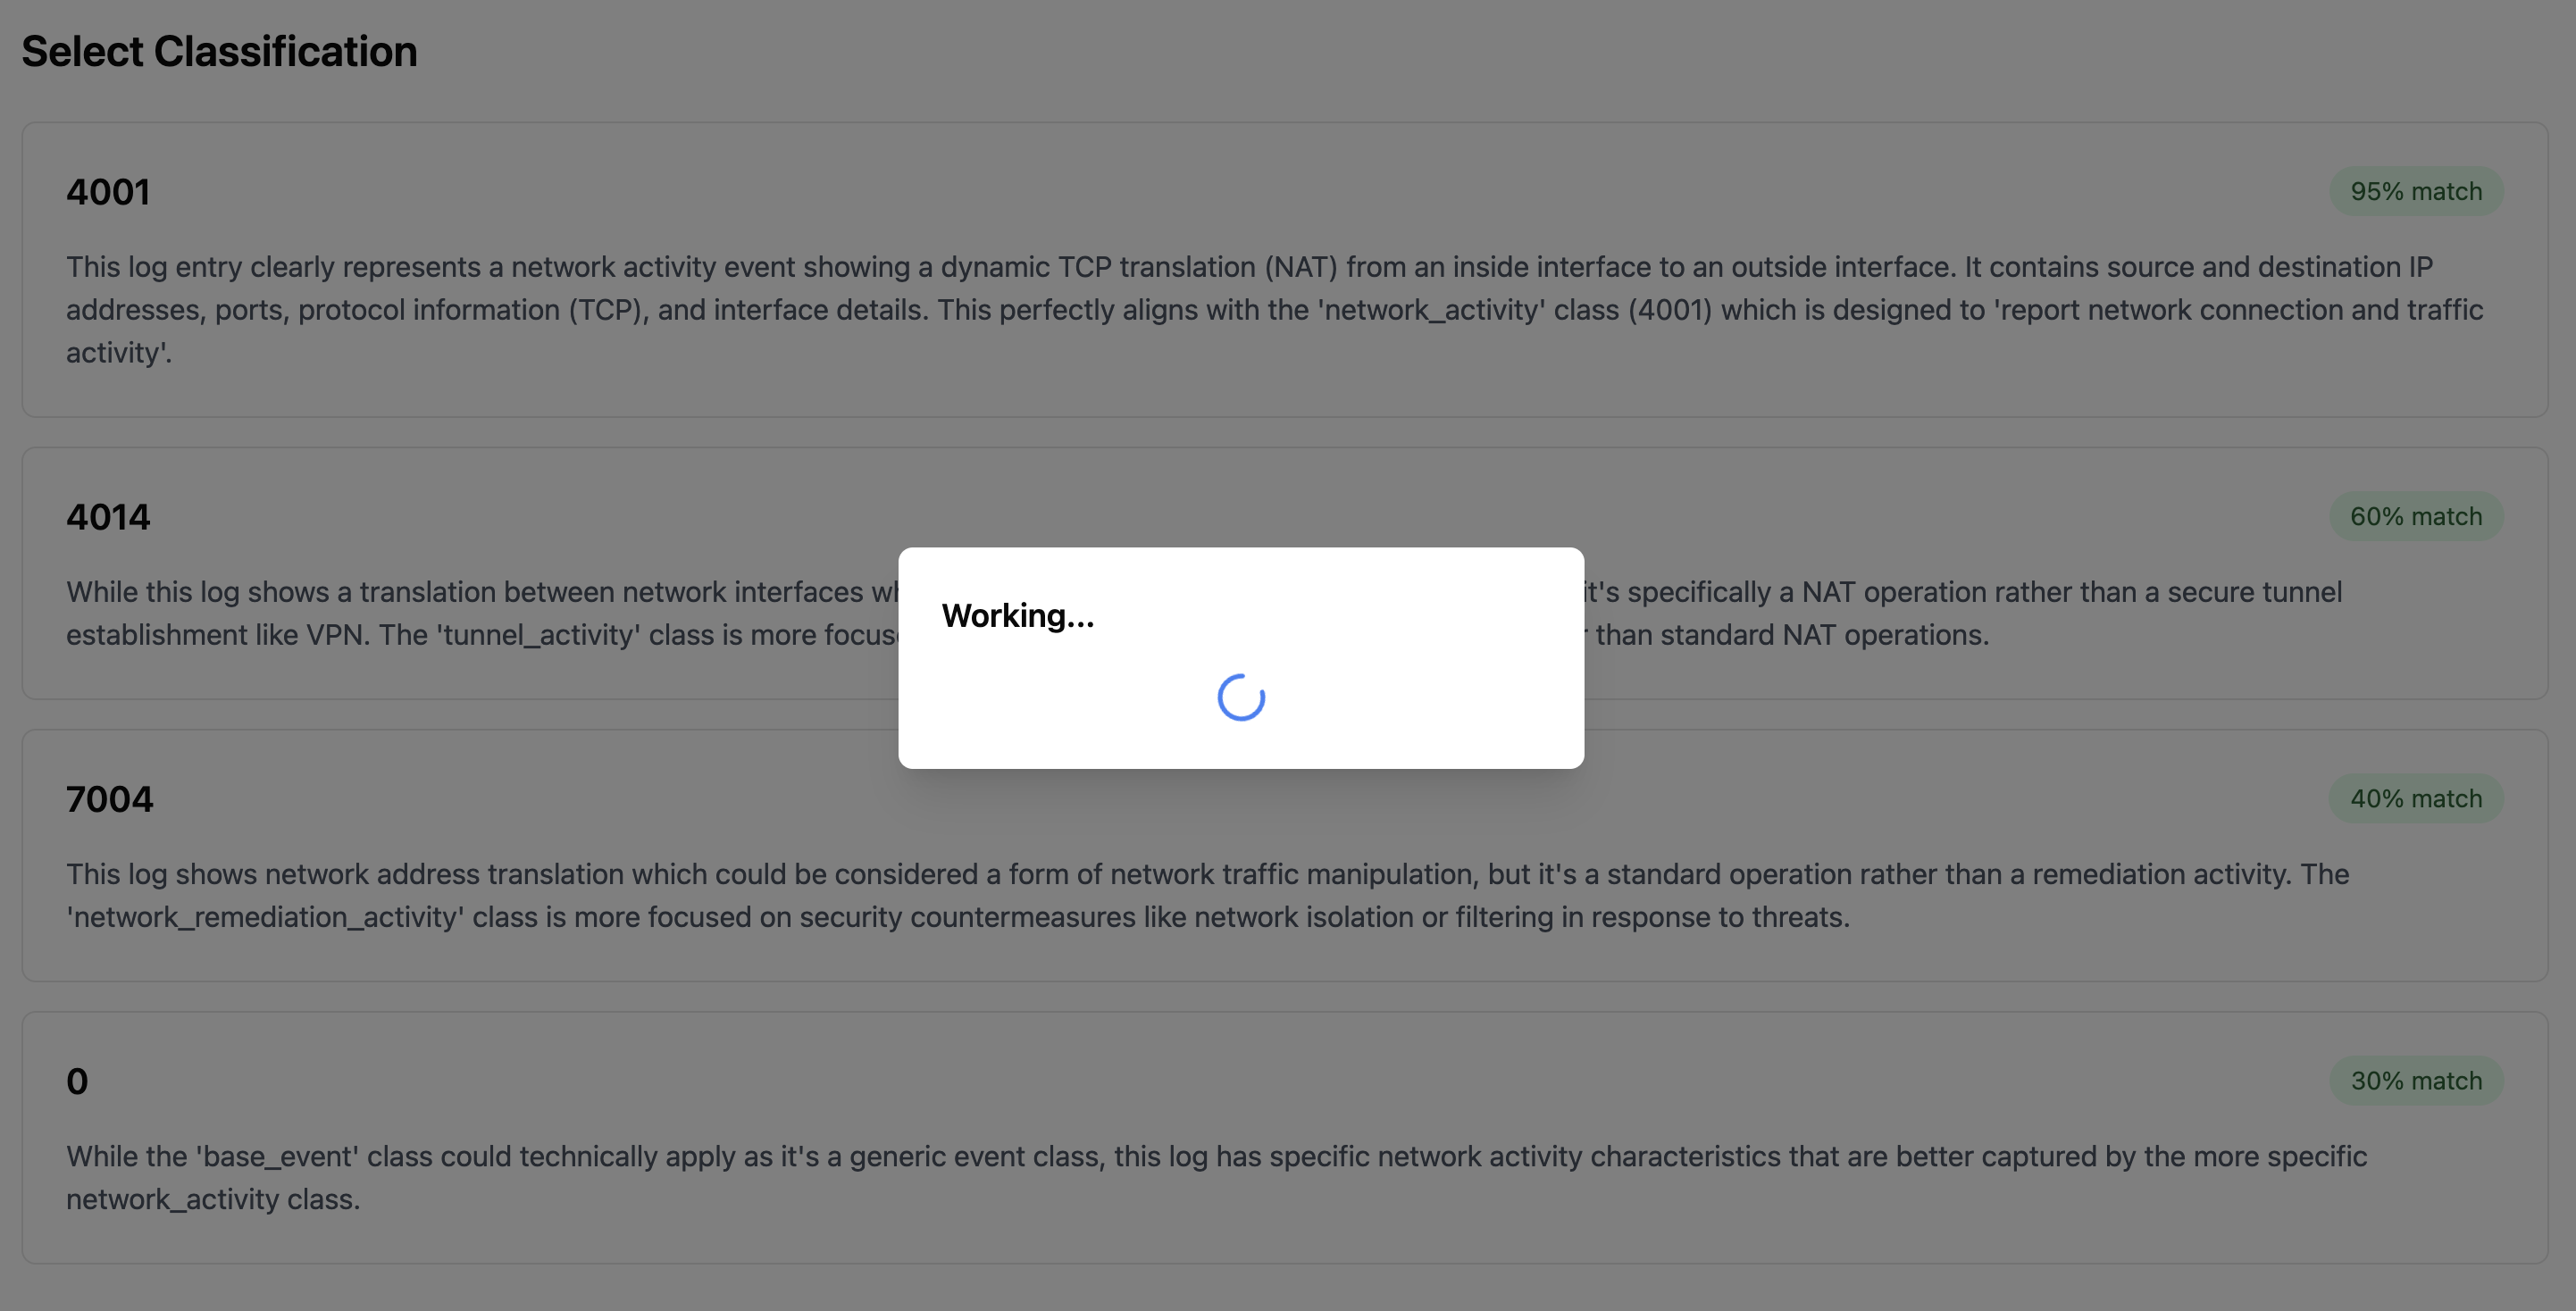
The quality of the additional context greatly determines the AI accuracy. Make sure you provide clear and comprehensive explanation or specs about the sample logs. Formatting the context is NOT important.
Editing Mapping Rules
The mapping editor provides two modes for editing rules:
Visual Mode
In Visual Mode, you can:
- Click on fields to edit them through a user-friendly interface
- See field definitions and documentation
- Get generation assistance for individual fields
Modify field
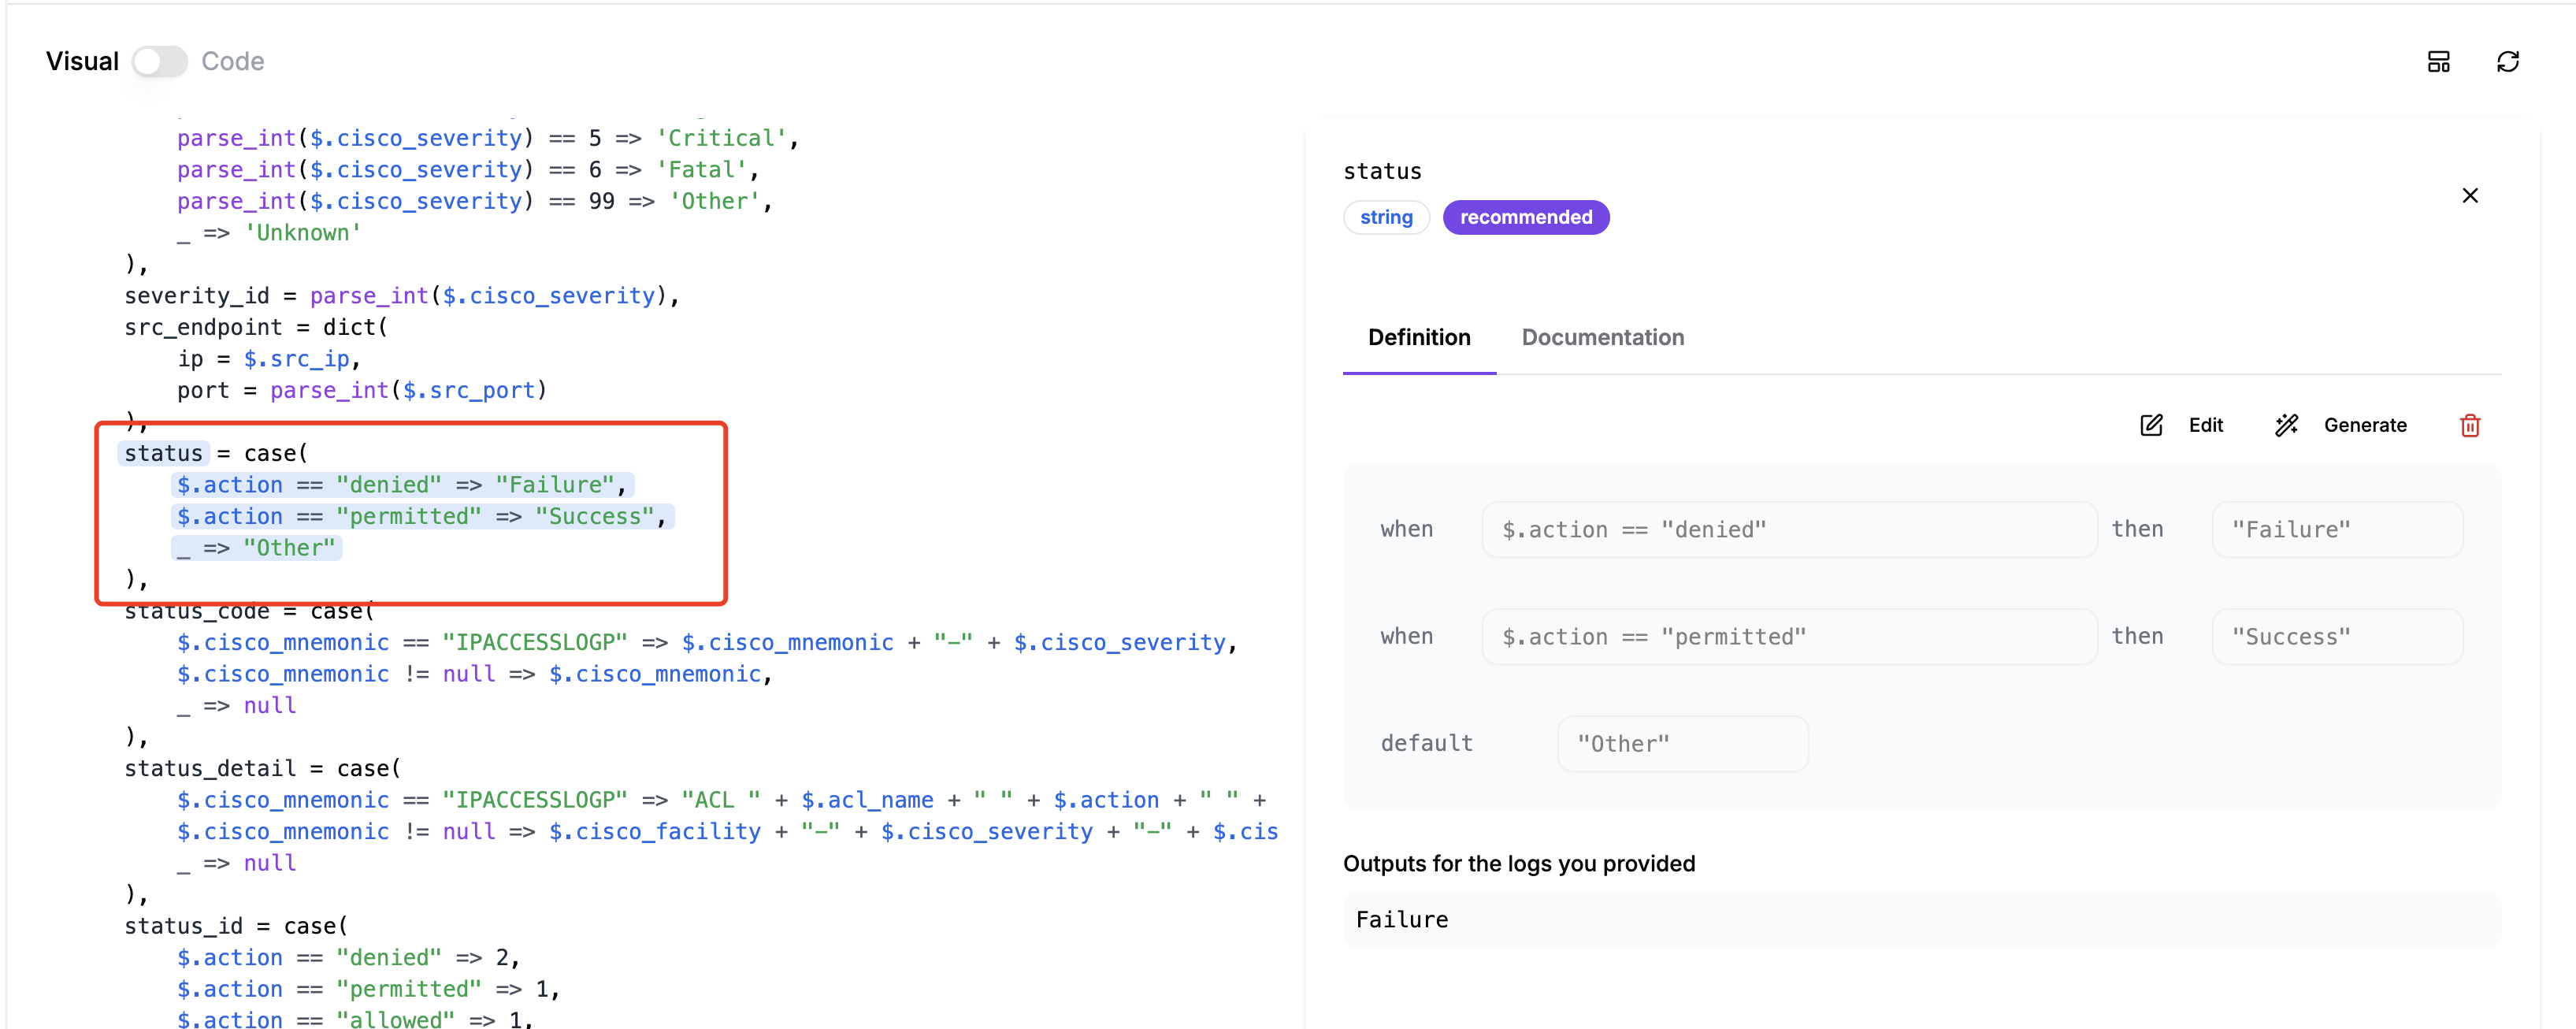
On the "Transformation Rule" page, click on the field you want to modify. The "Definition" of the relevant field will appear on the right.
You can choose between "Generate" and "Edit" to modify the field value definition.
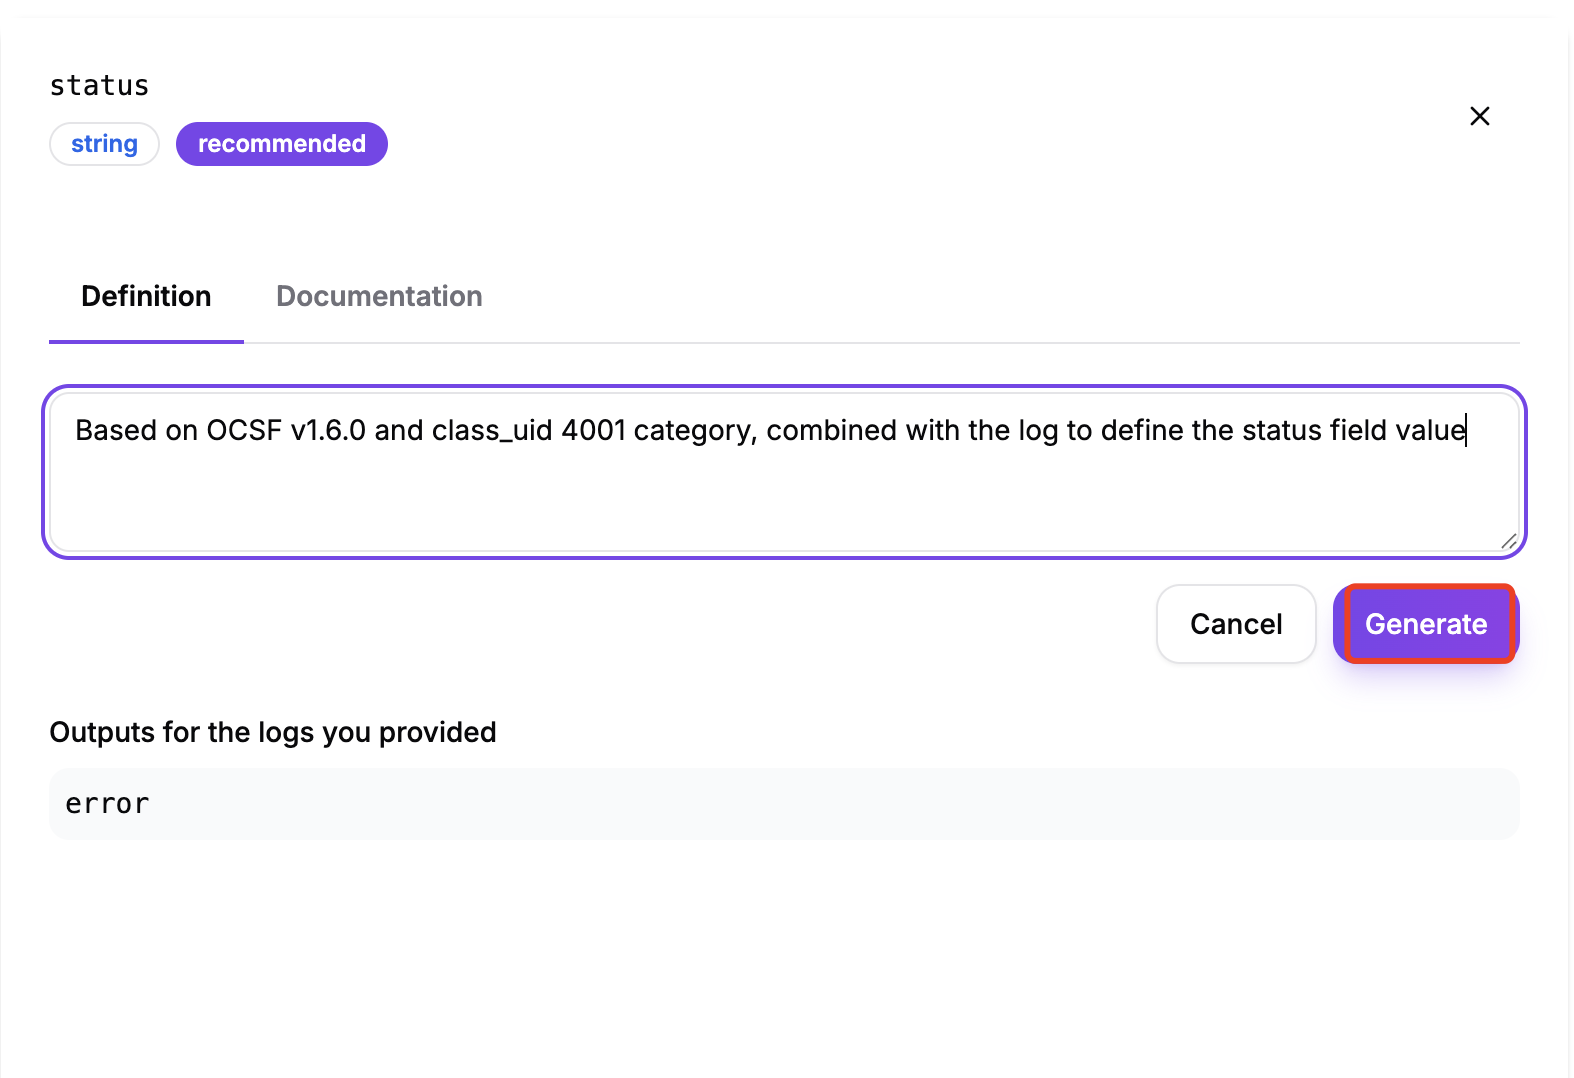
Selecting "Generate":
- Enter a description of the field in the input box to let the AI generate the relevant value definition.
- Click "Accept" to apply the generated value definition.
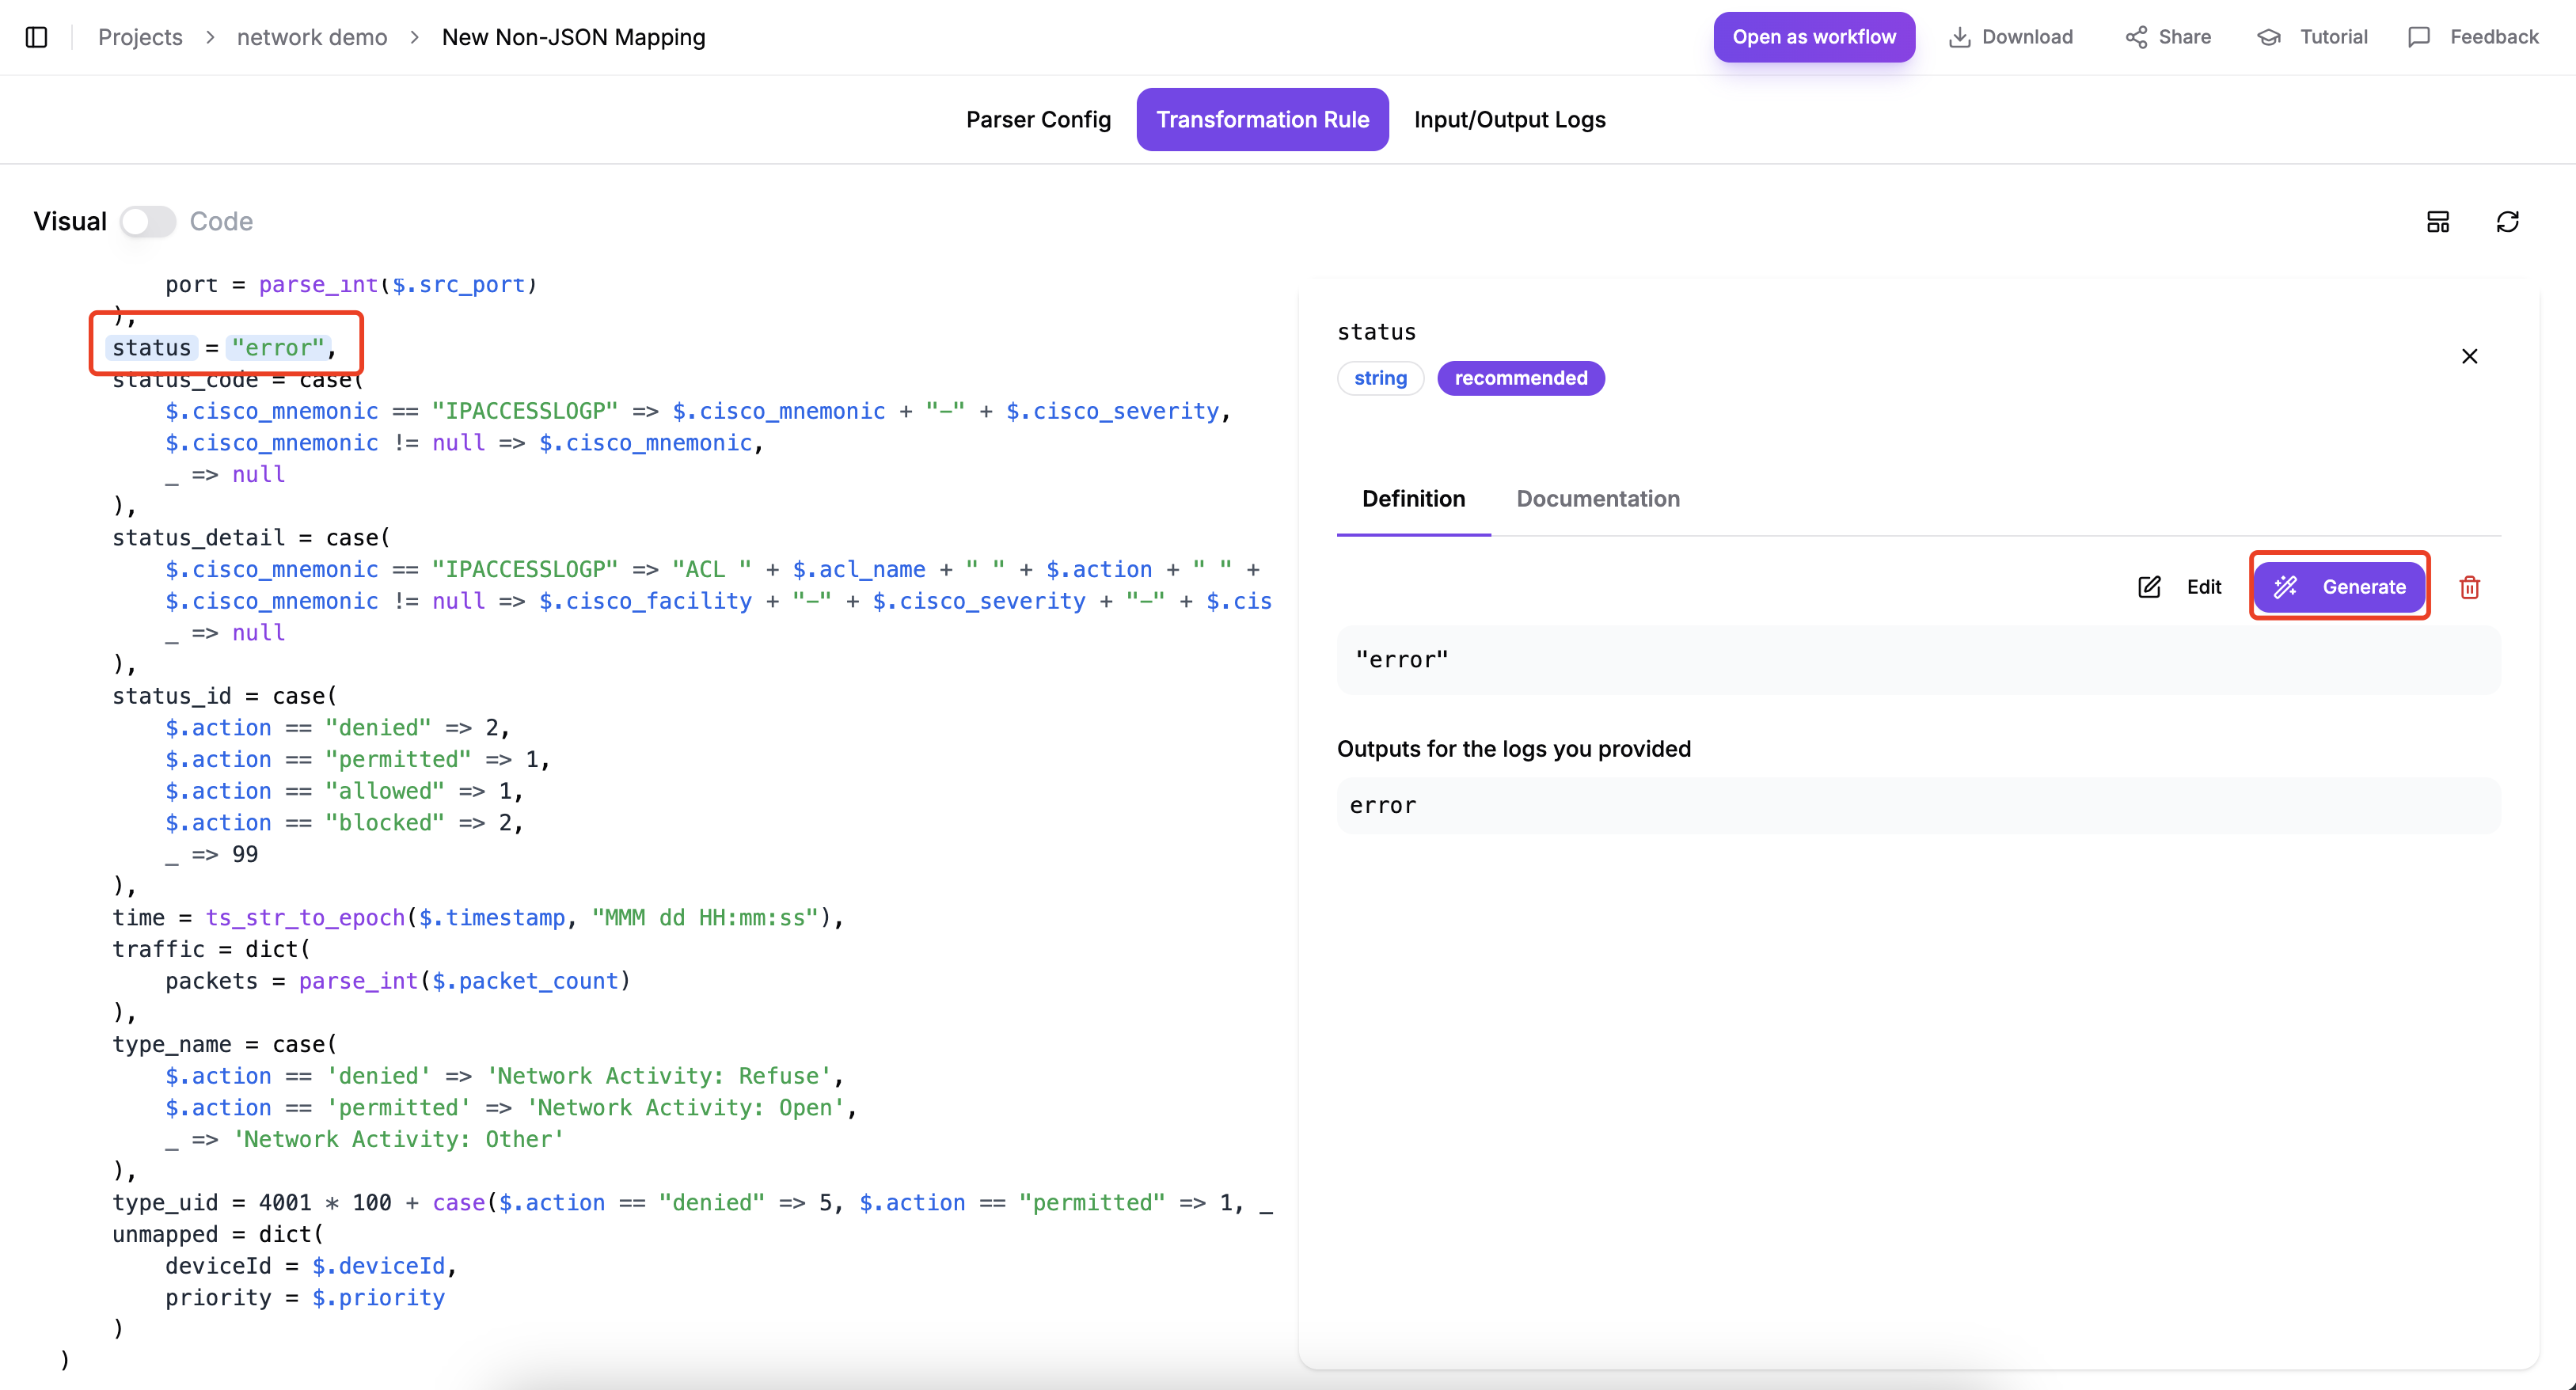
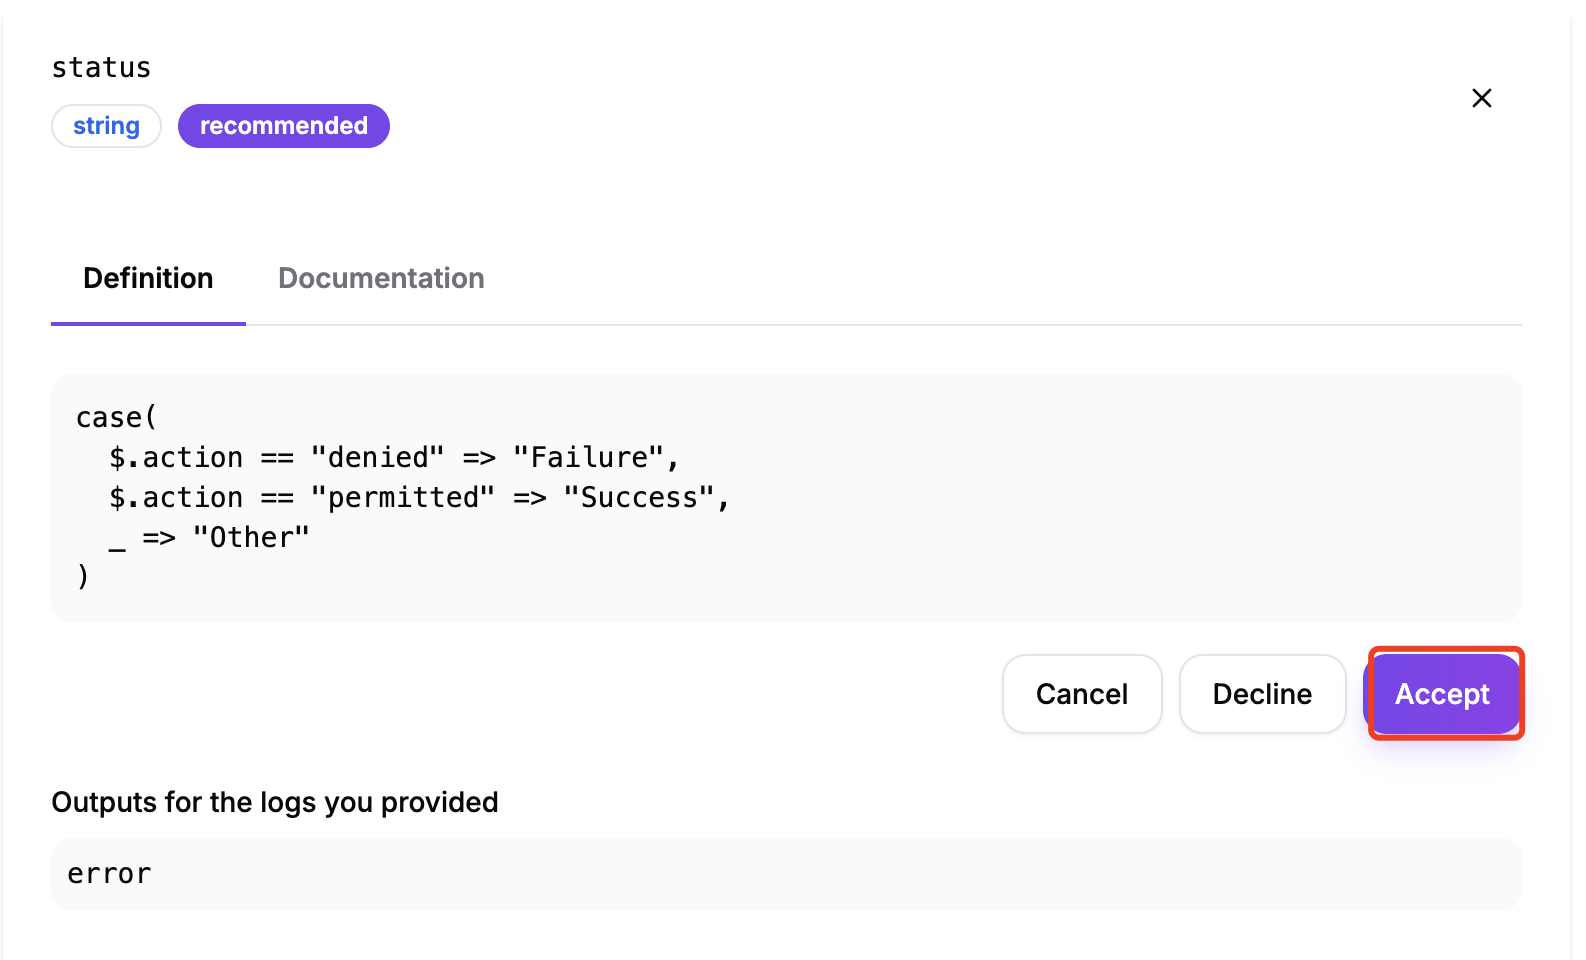
Check the code; the field value definition has taken effect.
Selecting "Edit":
- Modify the existing value or click "Add Rule".
- Click "Save" to apply the generated value definition.
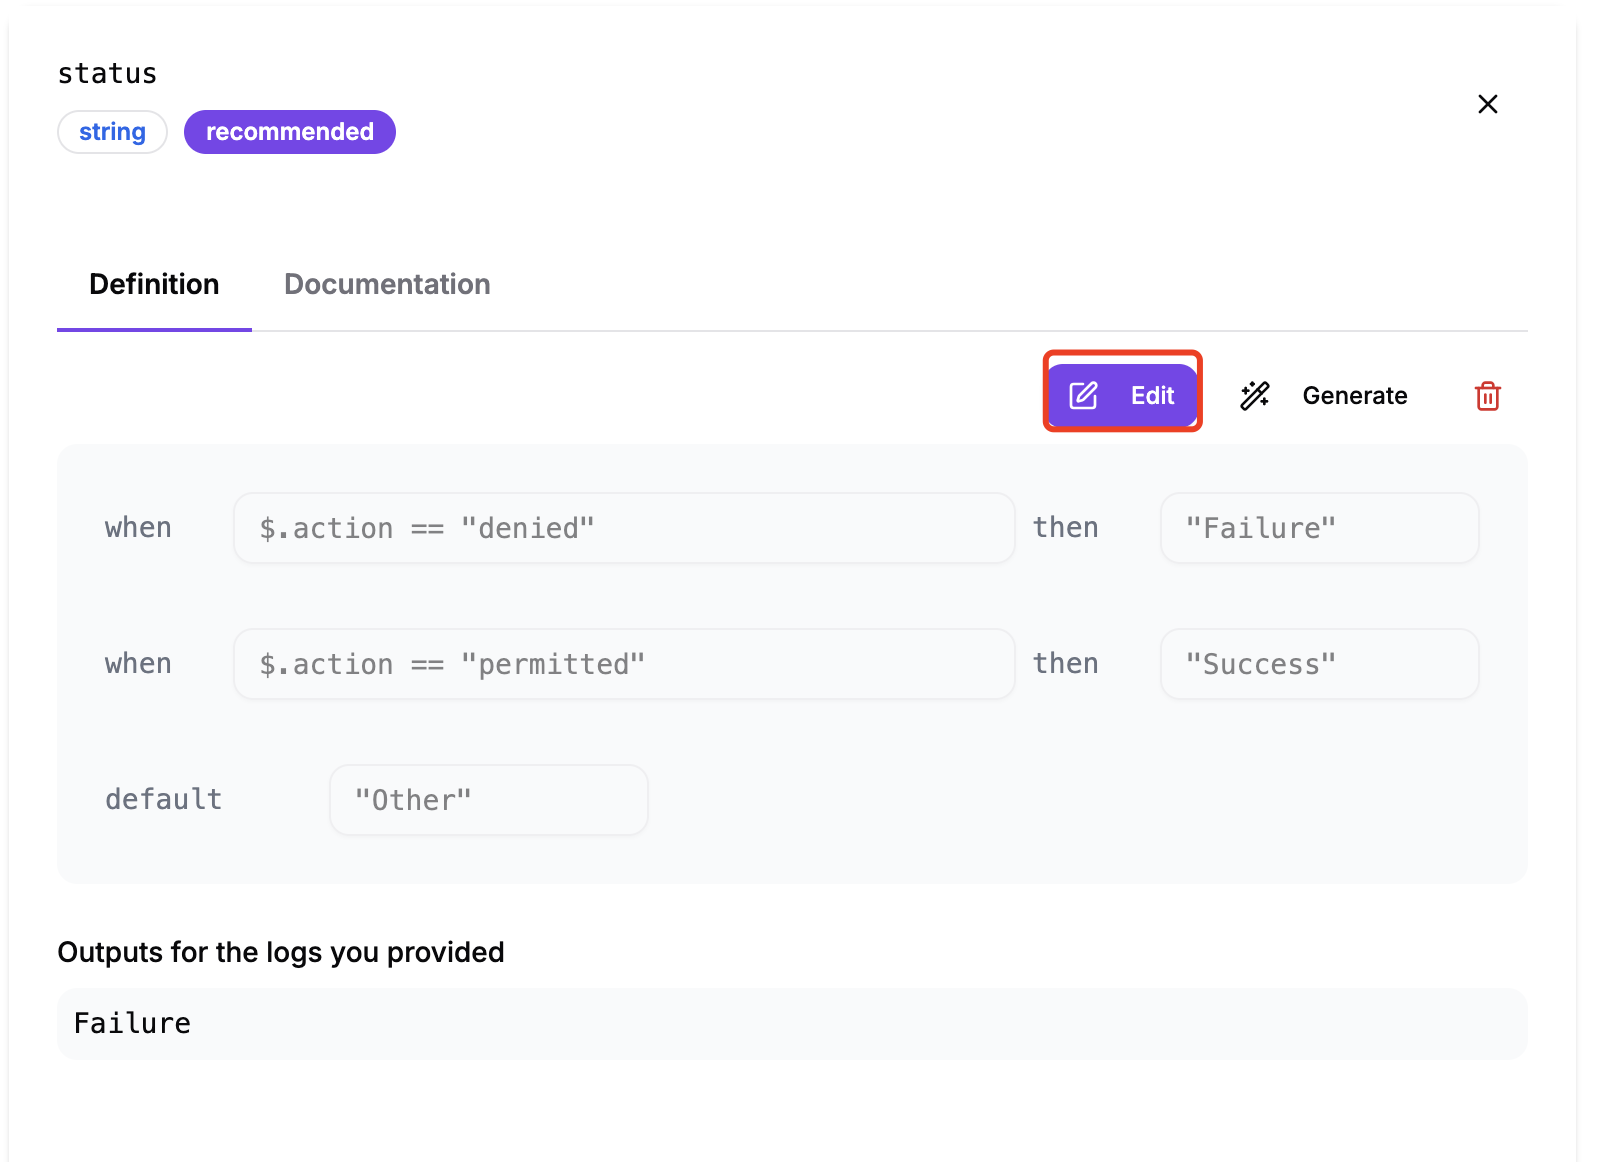
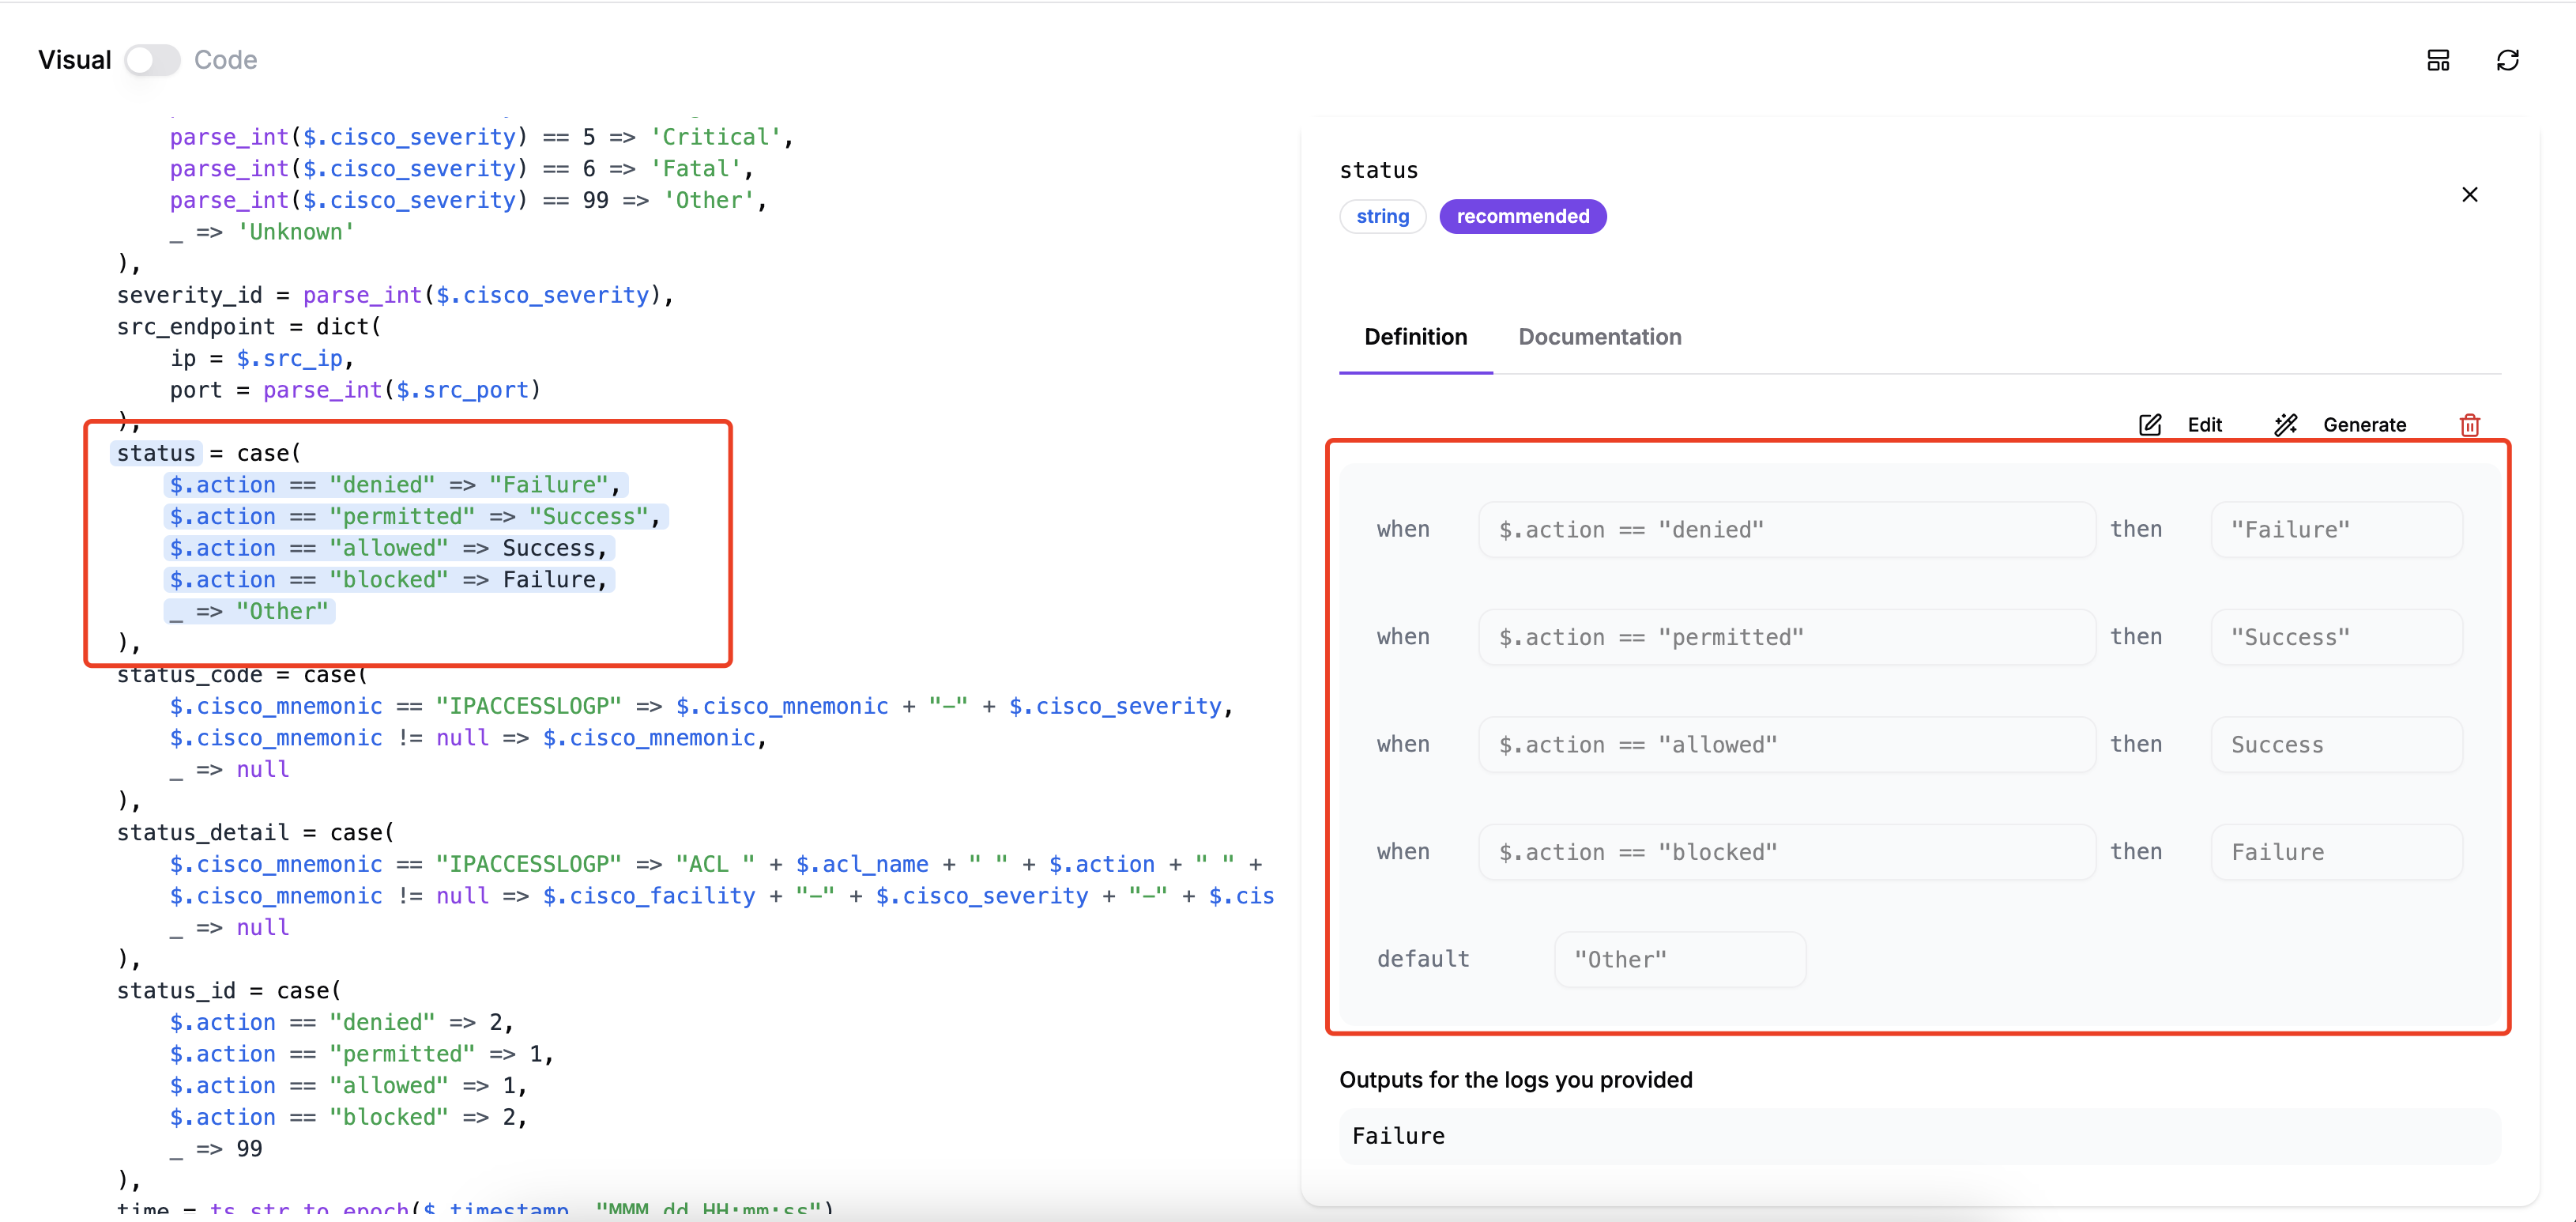
Check the code; the field value definition has taken effect.
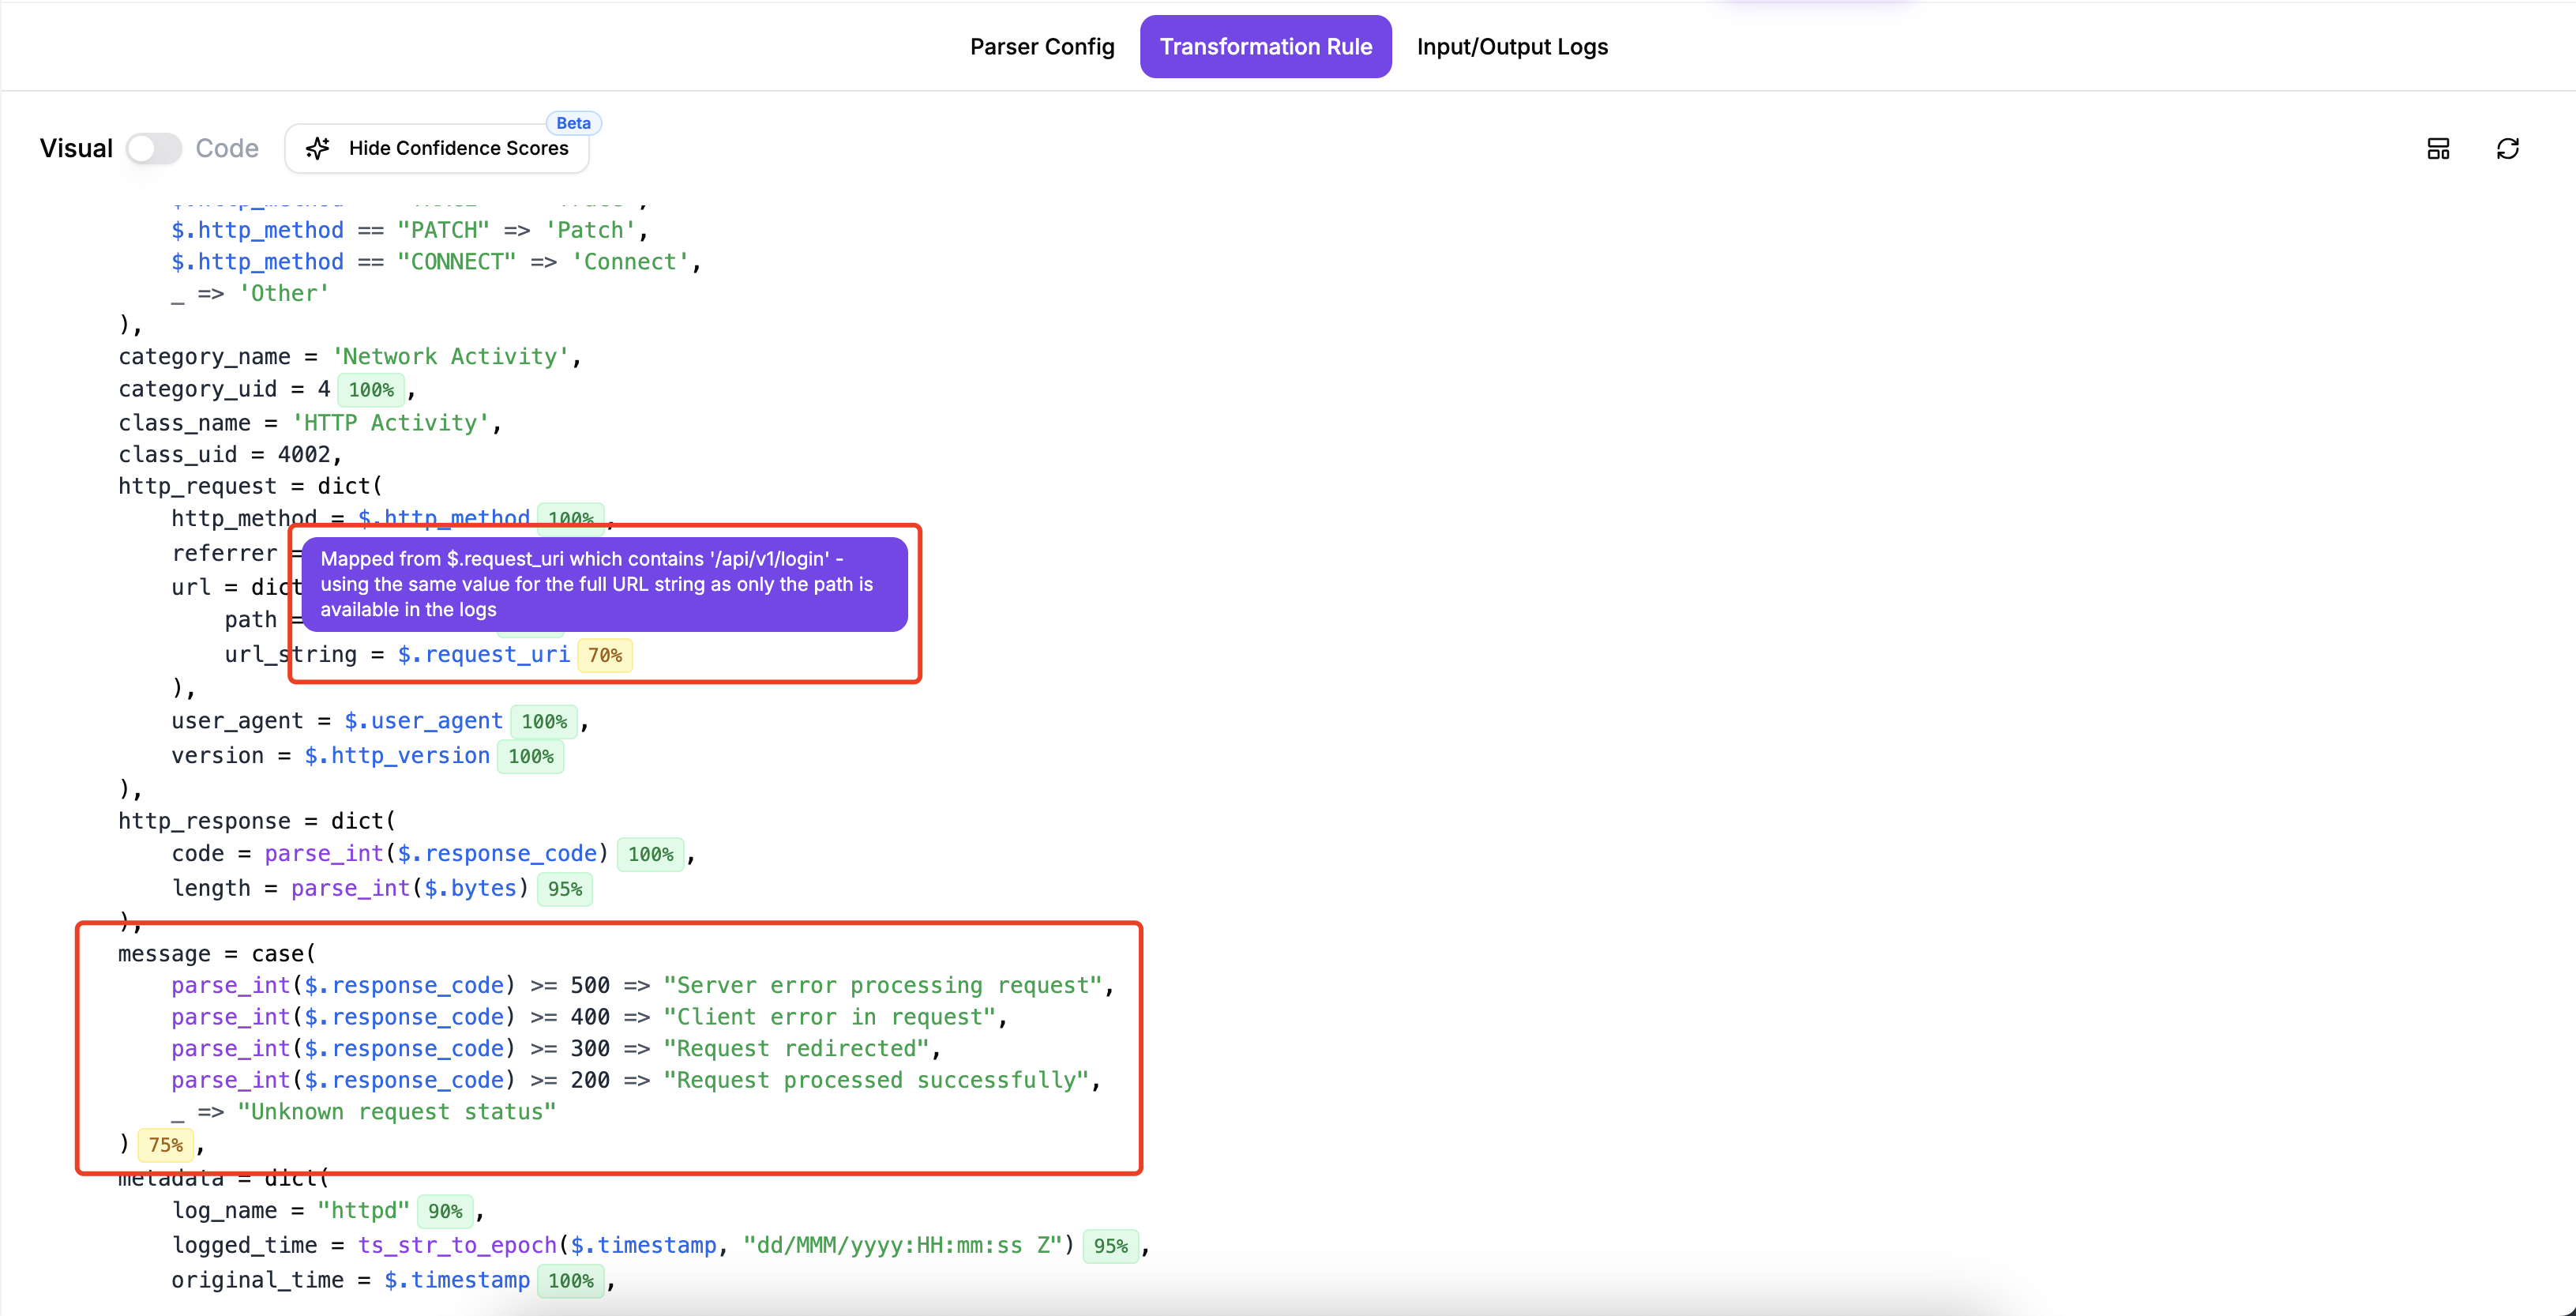
Mapping Confidence Source
When performing OCSF log mapping, the AI generates a Confidence Score for each field to indicate the accuracy and reliability of that mapping.
Click to toggle whether to display confidence information in the mapping editor.

Purpose of Hide Confidence Scores: Show Confidence Source: Displays detailed information about how the AI determined the confidence score, including:
- Analysis basis
- Referenced log fields
- Reasoning process
- Why this confidence score was given
Hide Confidence Source: Does not display detailed source and reasoning information
Confidence Score Summary

This is a summary panel showing the confidence score distribution for the entire mapping:
90% (High: 23)
Green indicator
- Indicates that 23 fields have a high confidence level (90%)
60% (Medium: 2)
Yellow indicator
- Indicates that 2 fields have a medium confidence level (60%)
30% (Low: 0)
Red indicator
- Indicates that 0 fields have a low confidence level (30%)
Function Description
Confidence Level Meaning
- High (90%) - High Confidence
The AI is very confident that this mapping is correct. Usually based on clear field name matching or clear context. Generally requires no manual intervention.
- Medium (60%) - Medium Confidence
The AI has some confidence, but is not completely certain. May require manual review. It is recommended to check the mapping logic of these fields.
- Low (30%) - Low Confidence
The AI is not very confident about this mapping. Manual review and correction are strongly recommended. More contextual information may need to be added for regeneration.
Prioritize processing fields with low confidence scores.
Hovering your mouse over the confidence score will display an explanation of the score for the selected field.
Code Mode
In Code Mode, you can:
- Edit the FEEL expression directly in the code editor
- Have full control over the mapping logic
- Use advanced expressions and functions
On the "Transformation Rule" page, click the "Visual Code" button above the code box on the left to switch to "Code Mode".
You can then modify the code in the code box as needed. After making changes, click the "change save" button at the top of the code box to save the modified code.
The "change save" button is disabled when no changes have been made to the code; modifications must be made before it can be used.
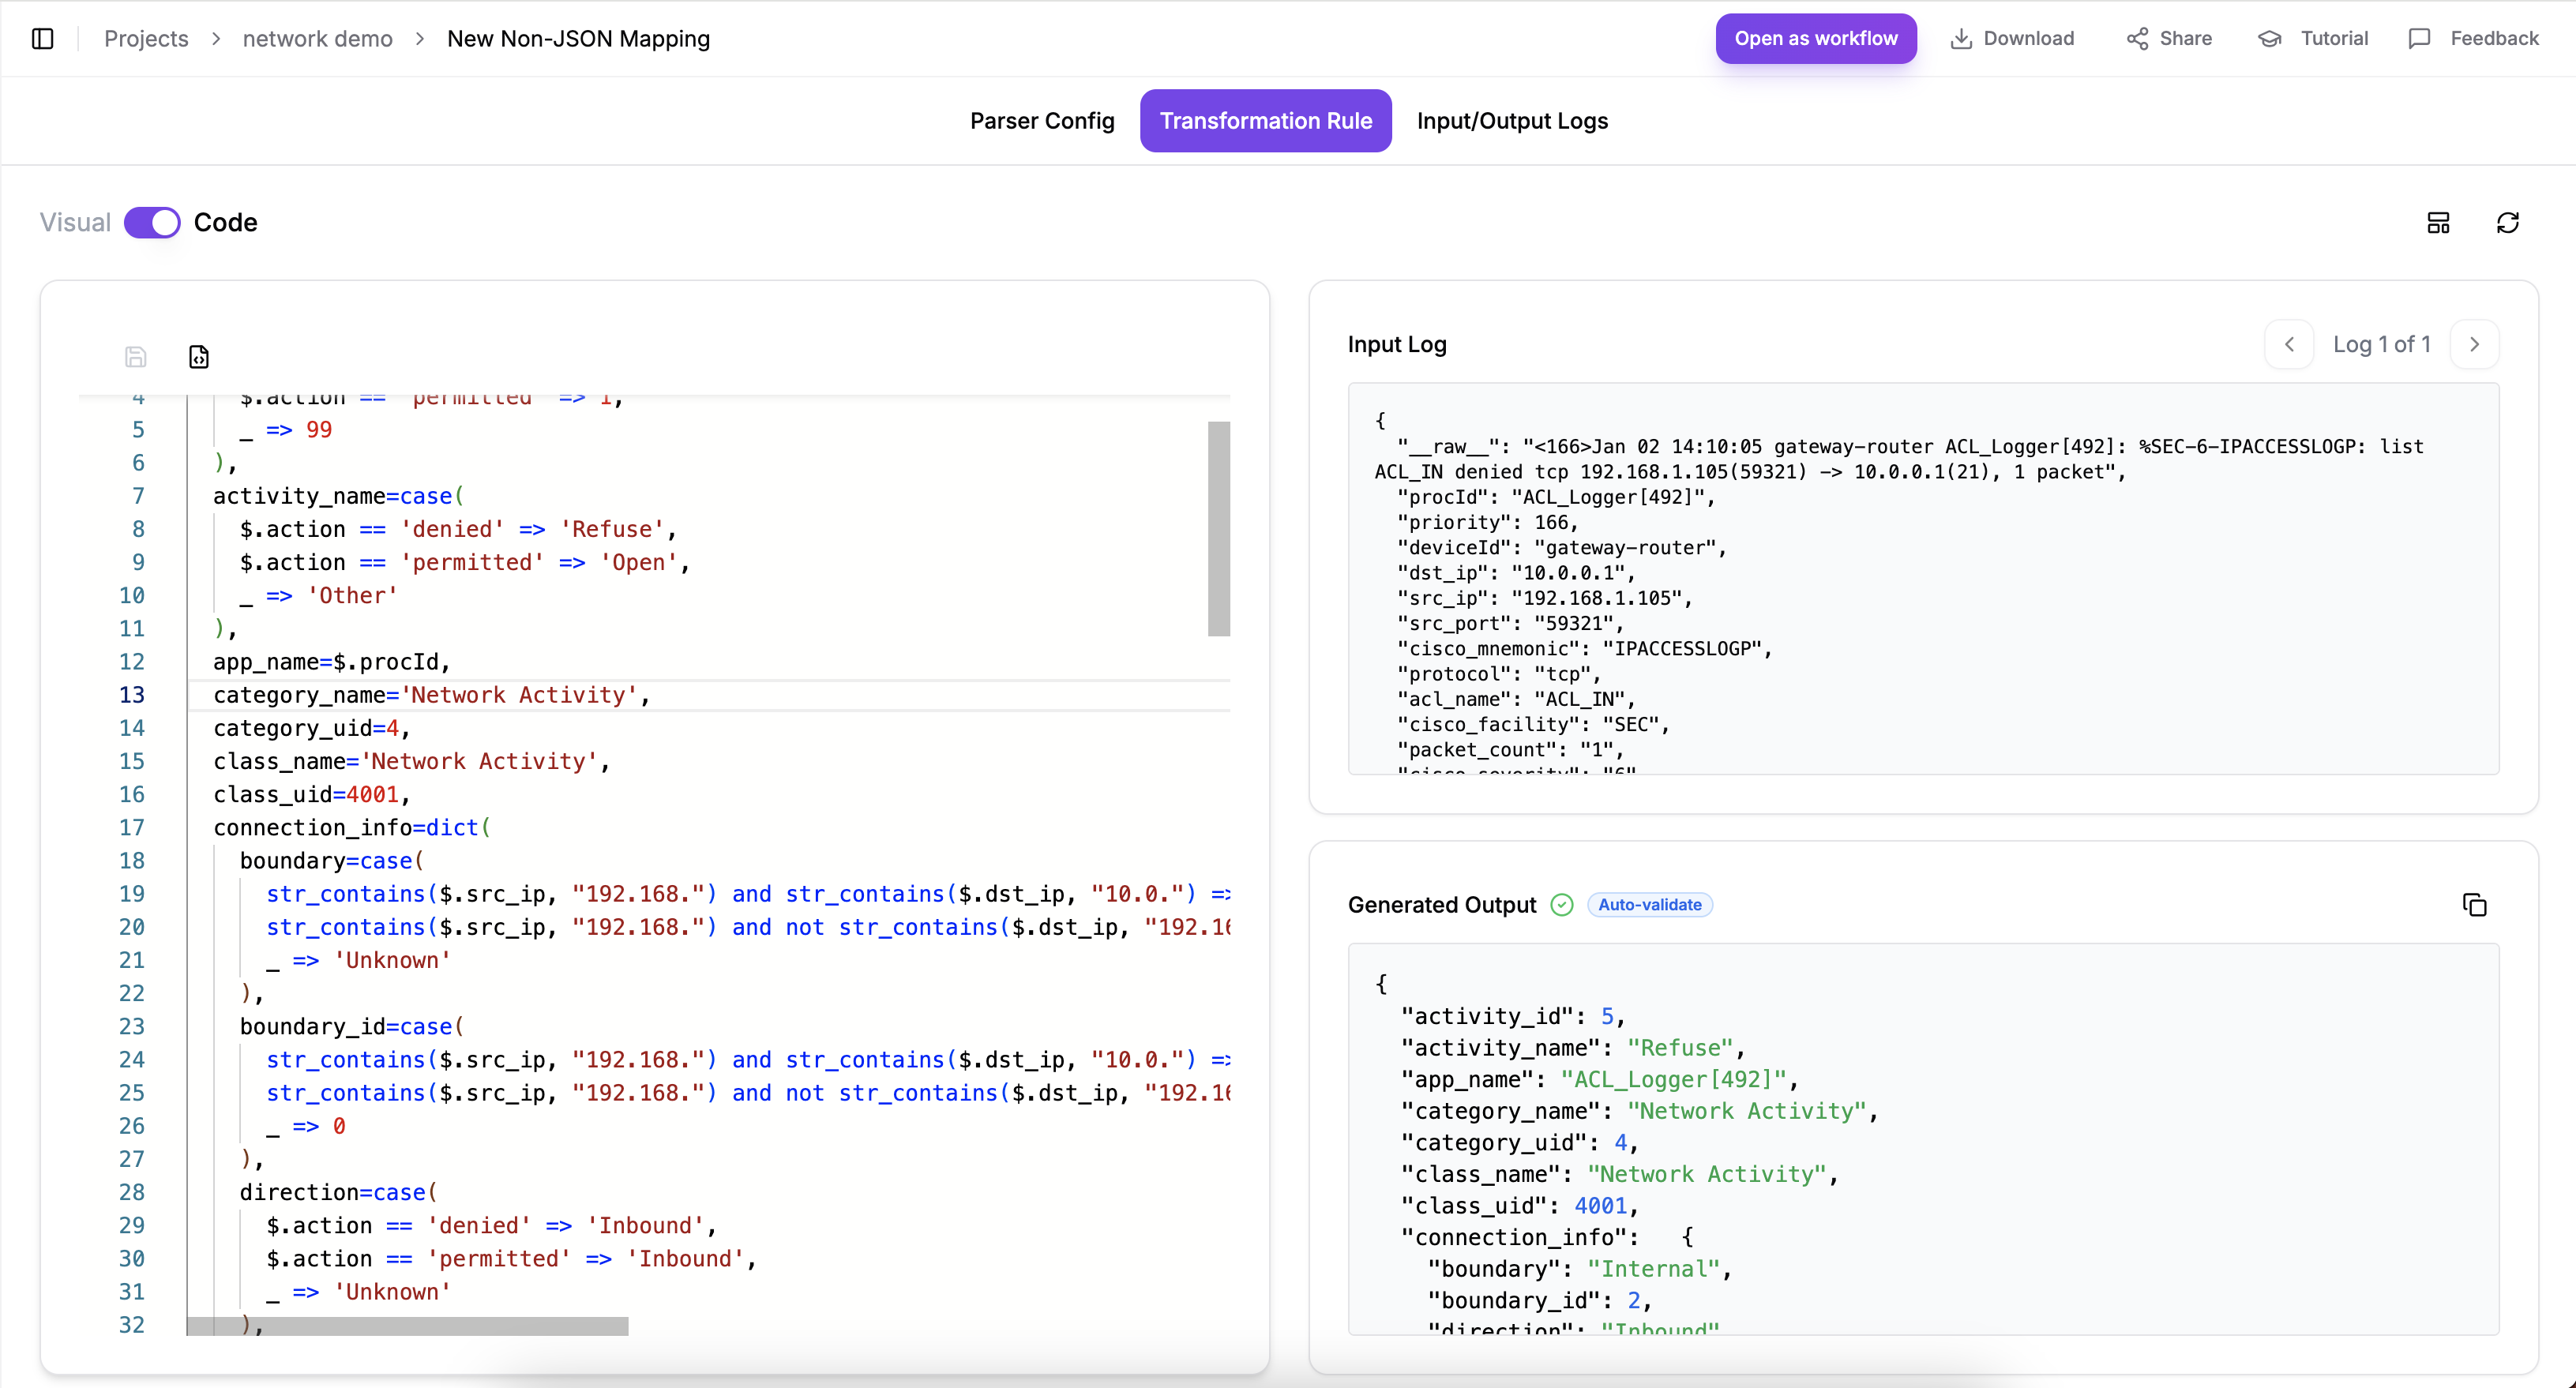
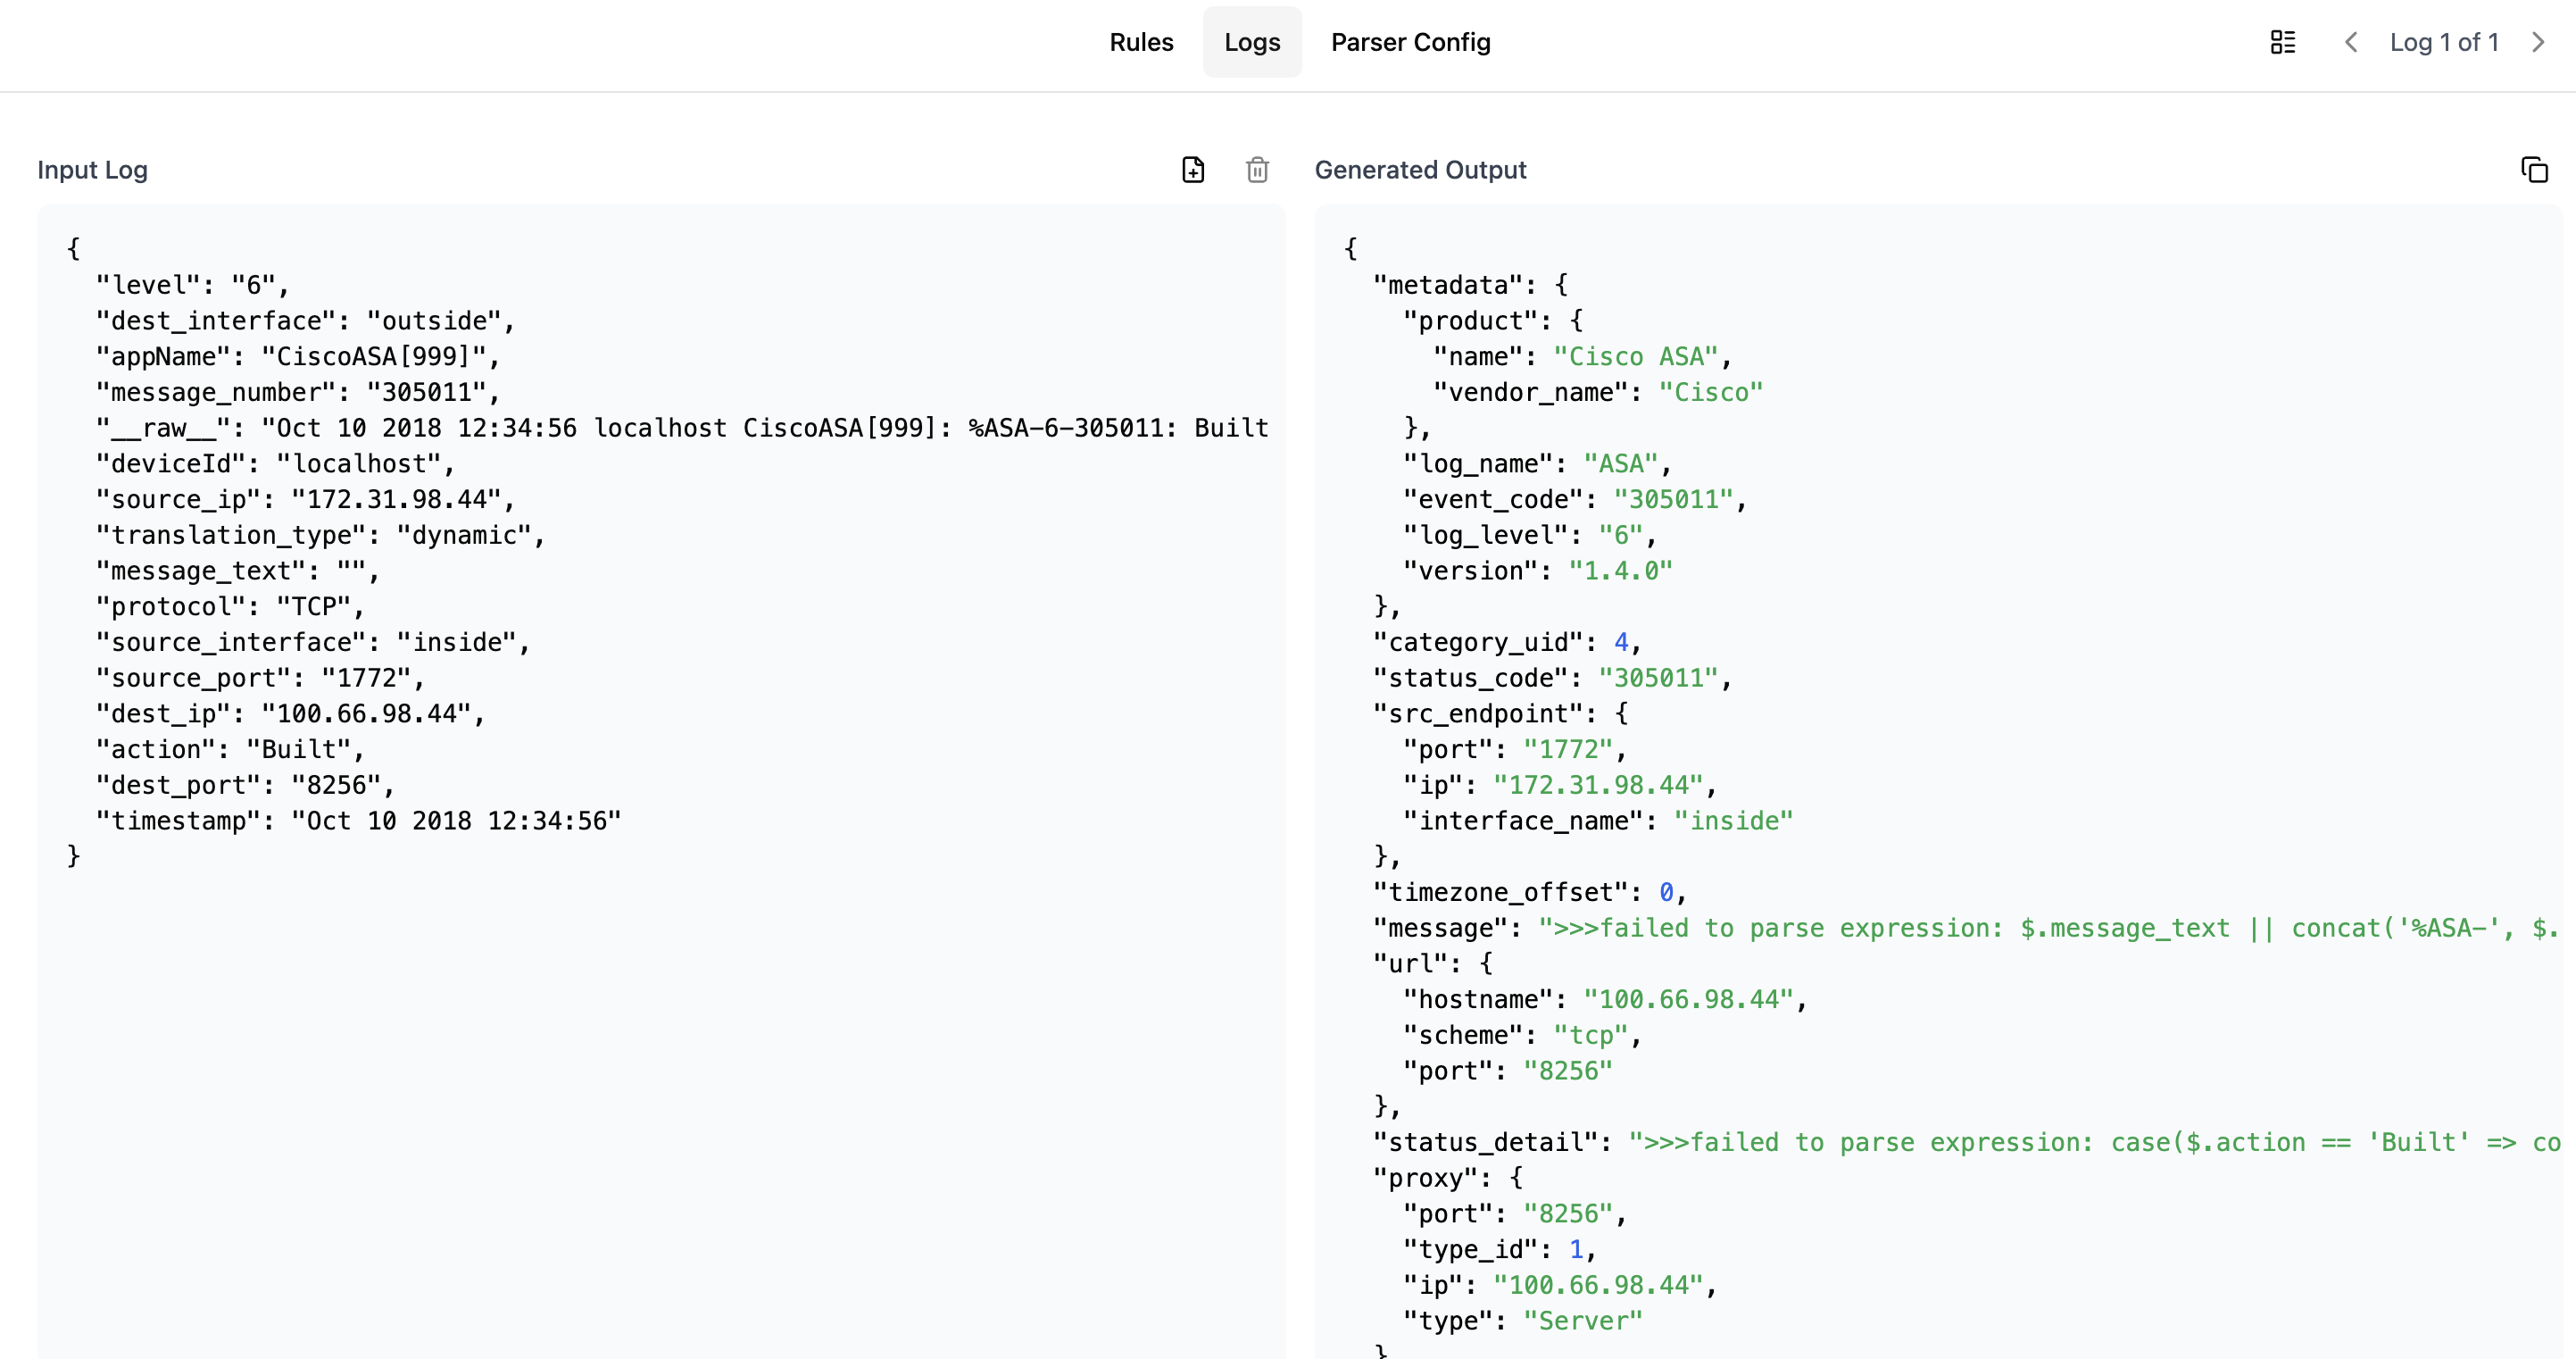
Testing Your Mapping
To verify your mapping:
- Go to the "Logs" tab
- Add or modify sample logs
- View the mapping results
- Make adjustments as needed
Downloading and Using the Mapping
Once you've completed your mapping configuration:
- Click the "Download Expression" button
- The mapping configuration can be directly used with ZephFlow
- For implementation guidance, refer to the ZephFlow Cisco ASA to OCSF tutorial