Understanding Data Flows in ZephFlow
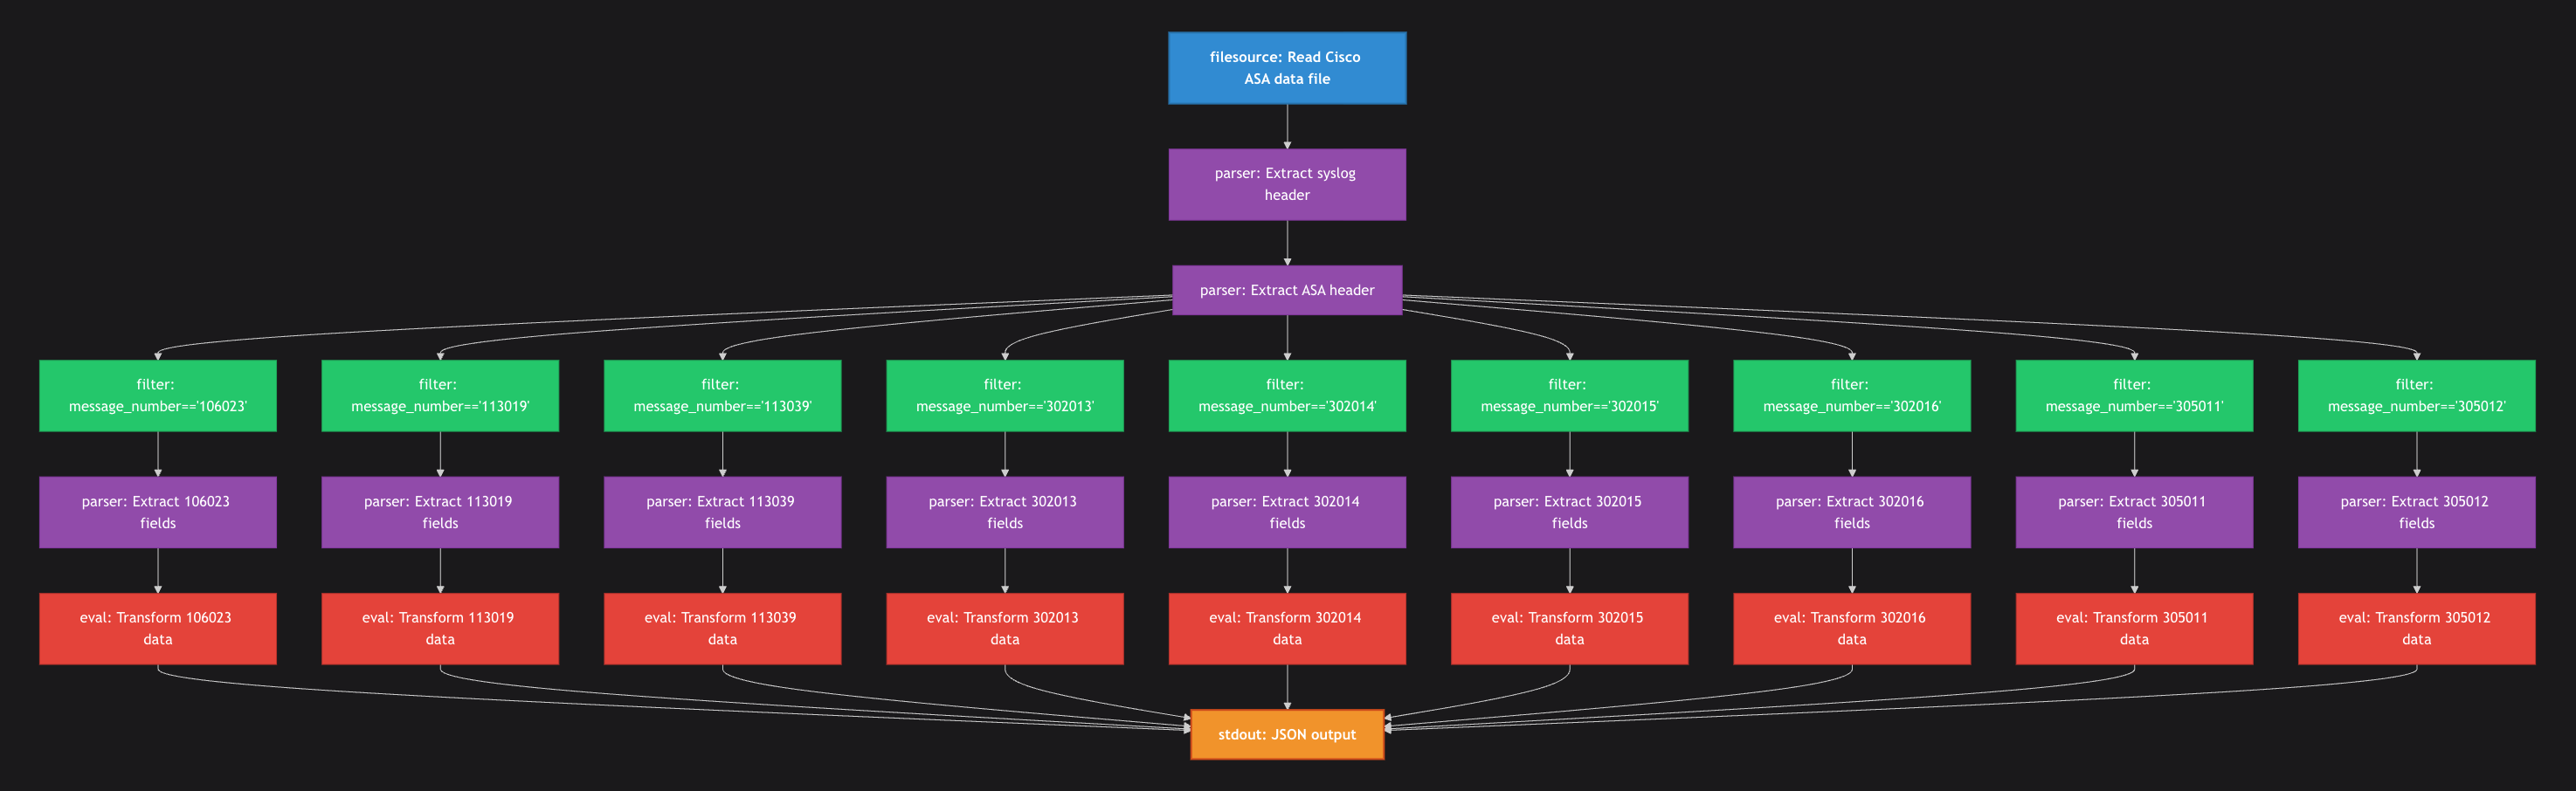
ZephFlow uses Directed Acyclic Graphs to define data processing logic, with support for branching, merging, and complex multi-step transformations from source to sink.
What is a DAG?
A Directed Acyclic Graph (DAG) is a fundamental concept in ZephFlow that defines how your data processing pipeline works. Let's break down what this means:
- Directed: Data flows in a specific direction, from one processing step to the next
- Acyclic: The data never flows in circles or loops
- Graph: A network of connected processing steps
Think of a DAG as a flowchart for your data, where each step performs a specific operation, and arrows show where the data goes next.
Data Processing with DAGs
In ZephFlow, a DAG defines the entire processing logic of your application. When you execute a ZephFlow pipeline:
- Data enters at source nodes (like reading from Kafka or a file)
- Flows through various transformation nodes (filtering, mapping, etc.)
- Exits through sink nodes (like writing to a database or file)
The Water Stream Analogy
A helpful way to visualize how data flows through a ZephFlow DAG is to imagine a stream of water:
- Source nodes are like springs where water (data) originates
- Processing nodes are like water filters or treatment plants that change the water
- Connections are like pipes that direct the water flow
- Branching points split the water into multiple streams
- Merging points combine streams back together
- Sink nodes are like reservoirs where the water ultimately collects
Each drop of water (record) follows the defined paths, being transformed along the way until it reaches its destination.
Core Components of a ZephFlow DAG
A ZephFlow DAG consists of three main elements:
- Nodes: Individual processing steps (commands) in the pipeline
- Connections: Directed edges that define how data flows between nodes
- Job Context: Optional configuration that applies to the entire pipeline
Job Context
The jobContext section provides optional global configuration for the entire pipeline:
otherProperties: Custom key-value properties accessible throughout the pipelinemetricTags: Tags attached to metrics for monitoring (e.g.,env,service)logLevel: Sets ZephFlow's log level. Supported values:DEBUG,INFO,WARN,ERROR. Defaults toINFO.dlqConfig: Dead letter queue configuration (see Error Handling)
Example with log level:
jobContext:
  logLevel: debug
  metricTags:
    env: "staging"
    service: "data-processor"
Node Structure
Each node in a DAG has these key properties:
id: A unique identifier for the nodecommandName: The type of operation to perform (e.g., "filter", "eval", "kafkasource")config: A configuration map specific to the node (structure varies by command type)outputs: A list of node IDs that this node connects to (where data flows next)
DAG Definition Formats
ZephFlow supports two formats for defining DAGs:
YAML Format (for CLI usage)
jobContext:
  # Optional global configuration
  otherProperties:
  metricTags:
  logLevel:
  dlqConfig:

dag:
  - id: "inputNode"
    commandName: "kafkasource"
    config:
      broker: "localhost:9092"
      topic: "input-topic"
      groupId: "my-consumer-group"
      encodingType: "JSON_OBJECT"
    outputs:
      - "filterNode"

  - id: "filterNode"
    commandName: "filter"
    config:
      expression: $.status == "success"
    outputs:
      - "transformNode"

  - id: "transformNode"
    commandName: "eval"
    config:
      expression: |
        dict(
          user_id = $.user.id,
          timestamp = $.created_at,
          value = $.amount * 100
        )
    outputs:
      - "outputNode"

  - id: "outputNode"
    commandName: "kafkasink"
    config:
      broker: "localhost:9092"
      topic: "output-topic"
      encodingType: "JSON_OBJECT"
    outputs: [ ]
JSON Format (for HTTP API usage)
{
  "dag": [
    {
      "id": "inputNode",
      "commandName": "kafkasource",
      "config": {
        "broker": "localhost:9092",
        "topic": "input-topic",
        "groupId": "my-consumer-group",
        "encodingType": "JSON_OBJECT"
      },
      "outputs": [
        "filterNode"
      ]
    },
    {
      "id": "filterNode",
      "commandName": "filter",
      "config": {
        "expression": "$.status == \"success\""
      },
      "outputs": [
        "transformNode"
      ]
    },
    {
      "id": "transformNode",
      "commandName": "eval",
      "config": {
        "expression": "dict(\n  user_id = $.user.id,\n  timestamp = $.created_at,\n  value = $.amount * 100\n)"
      },
      "outputs": [
        "outputNode"
      ]
    },
    {
      "id": "outputNode",
      "commandName": "kafkasink",
      "config": {
        "broker": "localhost:9092",
        "topic": "output-topic",
        "encodingType": "JSON_OBJECT"
      },
      "outputs": []
    }
  ]
}
Creating a ZephFlow DAG
Let's walk through creating a simple DAG that processes JSON data:
Step 1: Define Your Processing Requirements
For this example, we'll create a DAG that:
- Reads JSON data from standard input
- Filters records where the "value" field is greater than 10
- Transforms the data by adding new fields
- Outputs the results to standard output
Step 2: Create the DAG Using the ZephFlow SDK
import io.fleak.commons.lib.serdes.EncodingType;
import io.fleak.commons.sdk.ZephFlow;

public class SimpleDataProcessor {
    public static void main(String[] args) throws Exception {
        // Create a flow starting point
        ZephFlow flow = ZephFlow.startFlow();

        // Define source: read JSON arrays from stdin
        ZephFlow inputFlow = flow.stdinSource(EncodingType.JSON_ARRAY);

        // Add filter: keep only records with value > 10
        ZephFlow filteredFlow = inputFlow.filter("$.value > 10");

        // Add transformation: enhance the data structure
        ZephFlow transformedFlow = filteredFlow.eval(
            "dict(" +
            "  original_value = $.value," +
            "  doubled_value = $.value * 2," +
            "  status = 'processed'," +
            "  timestamp = epoch_to_ts_str($.timestamp, \"yyyy-MM-dd'T'HH:mm:ss\")" +
            ")"
        );

        // Define sink: output JSON objects to stdout
        ZephFlow outputFlow = transformedFlow.stdoutSink(EncodingType.JSON_OBJECT);

        // Execute the flow directly within the Java program
        outputFlow.execute("simple_data_processor", "dev", "tutorial");
    }
}
Step 3: Run the DAG
Compile and run your Java application. You can now pipe JSON data to it:
echo '[{"value": 5, "timestamp": 1635724800000}, {"value": 15, "timestamp": 1635724800000}]' | java SimpleDataProcessor
Expected output:
{
  "original_value": 15,
  "doubled_value": 30,
  "status": "processed",
  "timestamp": "2021-11-01T00:00:00"
}
Step 4: Export the DAG Definition (Optional)
If you want to see the generated DAG definition or run it using the CLI tool:
// Add this to your Java program
AdjacencyListDagDefinition dagDefinition = outputFlow.buildDag();
System.out.println(dagDefinition);  // Prints YAML representation
Creating More Complex DAGs
For more complex processing needs, you can create branching and merging flows:
public class ComplexDataProcessor {
  public static void main(String[] args) throws Exception {
    // Create a flow with branching and merging
    ZephFlow flow = ZephFlow.startFlow();

    ZephFlow inputFlow = flow.stdinSource(EncodingType.JSON_ARRAY);

    // Branch 1: High-value transactions
    ZephFlow highValueFlow =
        inputFlow
            .filter("$.value >= 10")
            .eval("dict_merge($, dict(category='high-value', priority='urgent'))");

    // Branch 2: Standard transactions
    ZephFlow standardValueFlow =
        inputFlow
            .filter("$.value < 10")
            .eval("dict_merge($, dict(category='standard', priority='normal'))");

    // Merge the two flows
    ZephFlow mergedFlow = ZephFlow.merge(highValueFlow, standardValueFlow);

    // Add final processing and output
    ZephFlow outputFlow =
        mergedFlow
            .eval("dict_merge($, dict(processed_at=epoch_to_ts_str($.timestamp, \"yyyy-MM-dd'T'HH:mm:ss\")))")
            .stdoutSink(EncodingType.JSON_OBJECT);

    // Execute the flow
    outputFlow.execute("transaction_processor", "dev", "tutorial");
  }
}
Compile and run your Java application. You can now pipe JSON data to it:
echo '[{"value": 5, "timestamp": 1635724800000}, {"value": 15, "timestamp": 1635724800000}]' | java ComplexDataProcessor
Expected output:
{"processed_at":"2021-10-31T17:00:00","category":"high-value","priority":"urgent","value":15,"timestamp":1635724800000}
{"processed_at":"2021-10-31T17:00:00","category":"standard","priority":"normal","value":5,"timestamp":1635724800000}
ZephFlow DAG Rules
ZephFlow enforces several rules to ensure your DAGs are valid and can process data correctly:
-
Entry Points:
- For standalone processing: A DAG must have exactly one source node
- For REST API backend: The DAG cannot contain source nodes (the API adds an HTTP source automatically)
-
Source Nodes cannot have incoming connections
-
Sink Nodes must be terminal nodes (cannot have outgoing connections)
-
Node IDs:
- Each node must have a unique ID within the DAG
- When using the SDK, IDs are generated automatically
-
Acyclic Requirement:
- The graph cannot contain cycles (data can't loop back to nodes it already passed through)
-
Non-empty DAG:
- A DAG must contain at least one node
Read Next
As you get more comfortable with ZephFlow, you can explore:
- More advanced node types and transformations
- Error handling with assertion nodes and dead-letter queues
- Integration with various data sources and sinks
- Monitoring and observability features